Original Link: https://www.anandtech.com/show/8978/msi-x99s-mpower-review
MSI X99S MPower Review: Sting Like a Bee
by Ian Cutress on February 17, 2015 9:00 AM EST- Posted in
- Intel
- MSI
- Motherboards
- Overclocking
- X99
In our recent run of overclocking focused motherboards, we have had a couple of interesting contenders. Sub $300 is a difficult market to attack for X99 overclockers, and MSI brings the X99S MPower which is the focus of today's review.
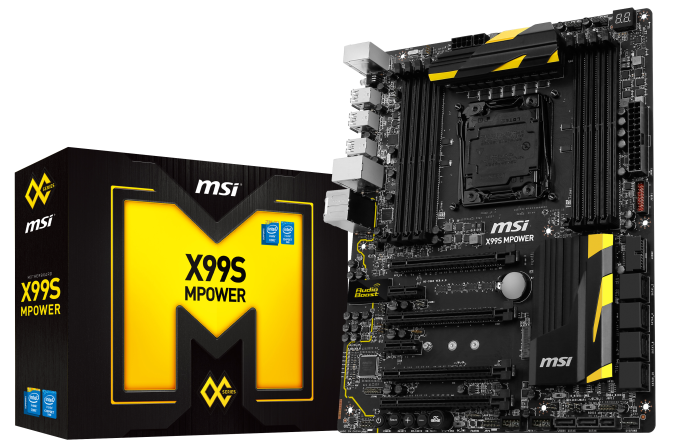
MSI X99S MPower Overview
While we have done a number of cheaper X99 overclocking motherboard reviews as of late, including the X99-SOC Champion and the X99 OC Formula, one common feature in these reviews has been how the manufacturers are learning how to get the balance right between making something desirable but also cost effective. We have remarked that while X99 is the high end expensive platform, users can still want to pair an i7-5820K with a cheap motherboard and get a six core overclocked beast. This is the aim of motherboards like these.
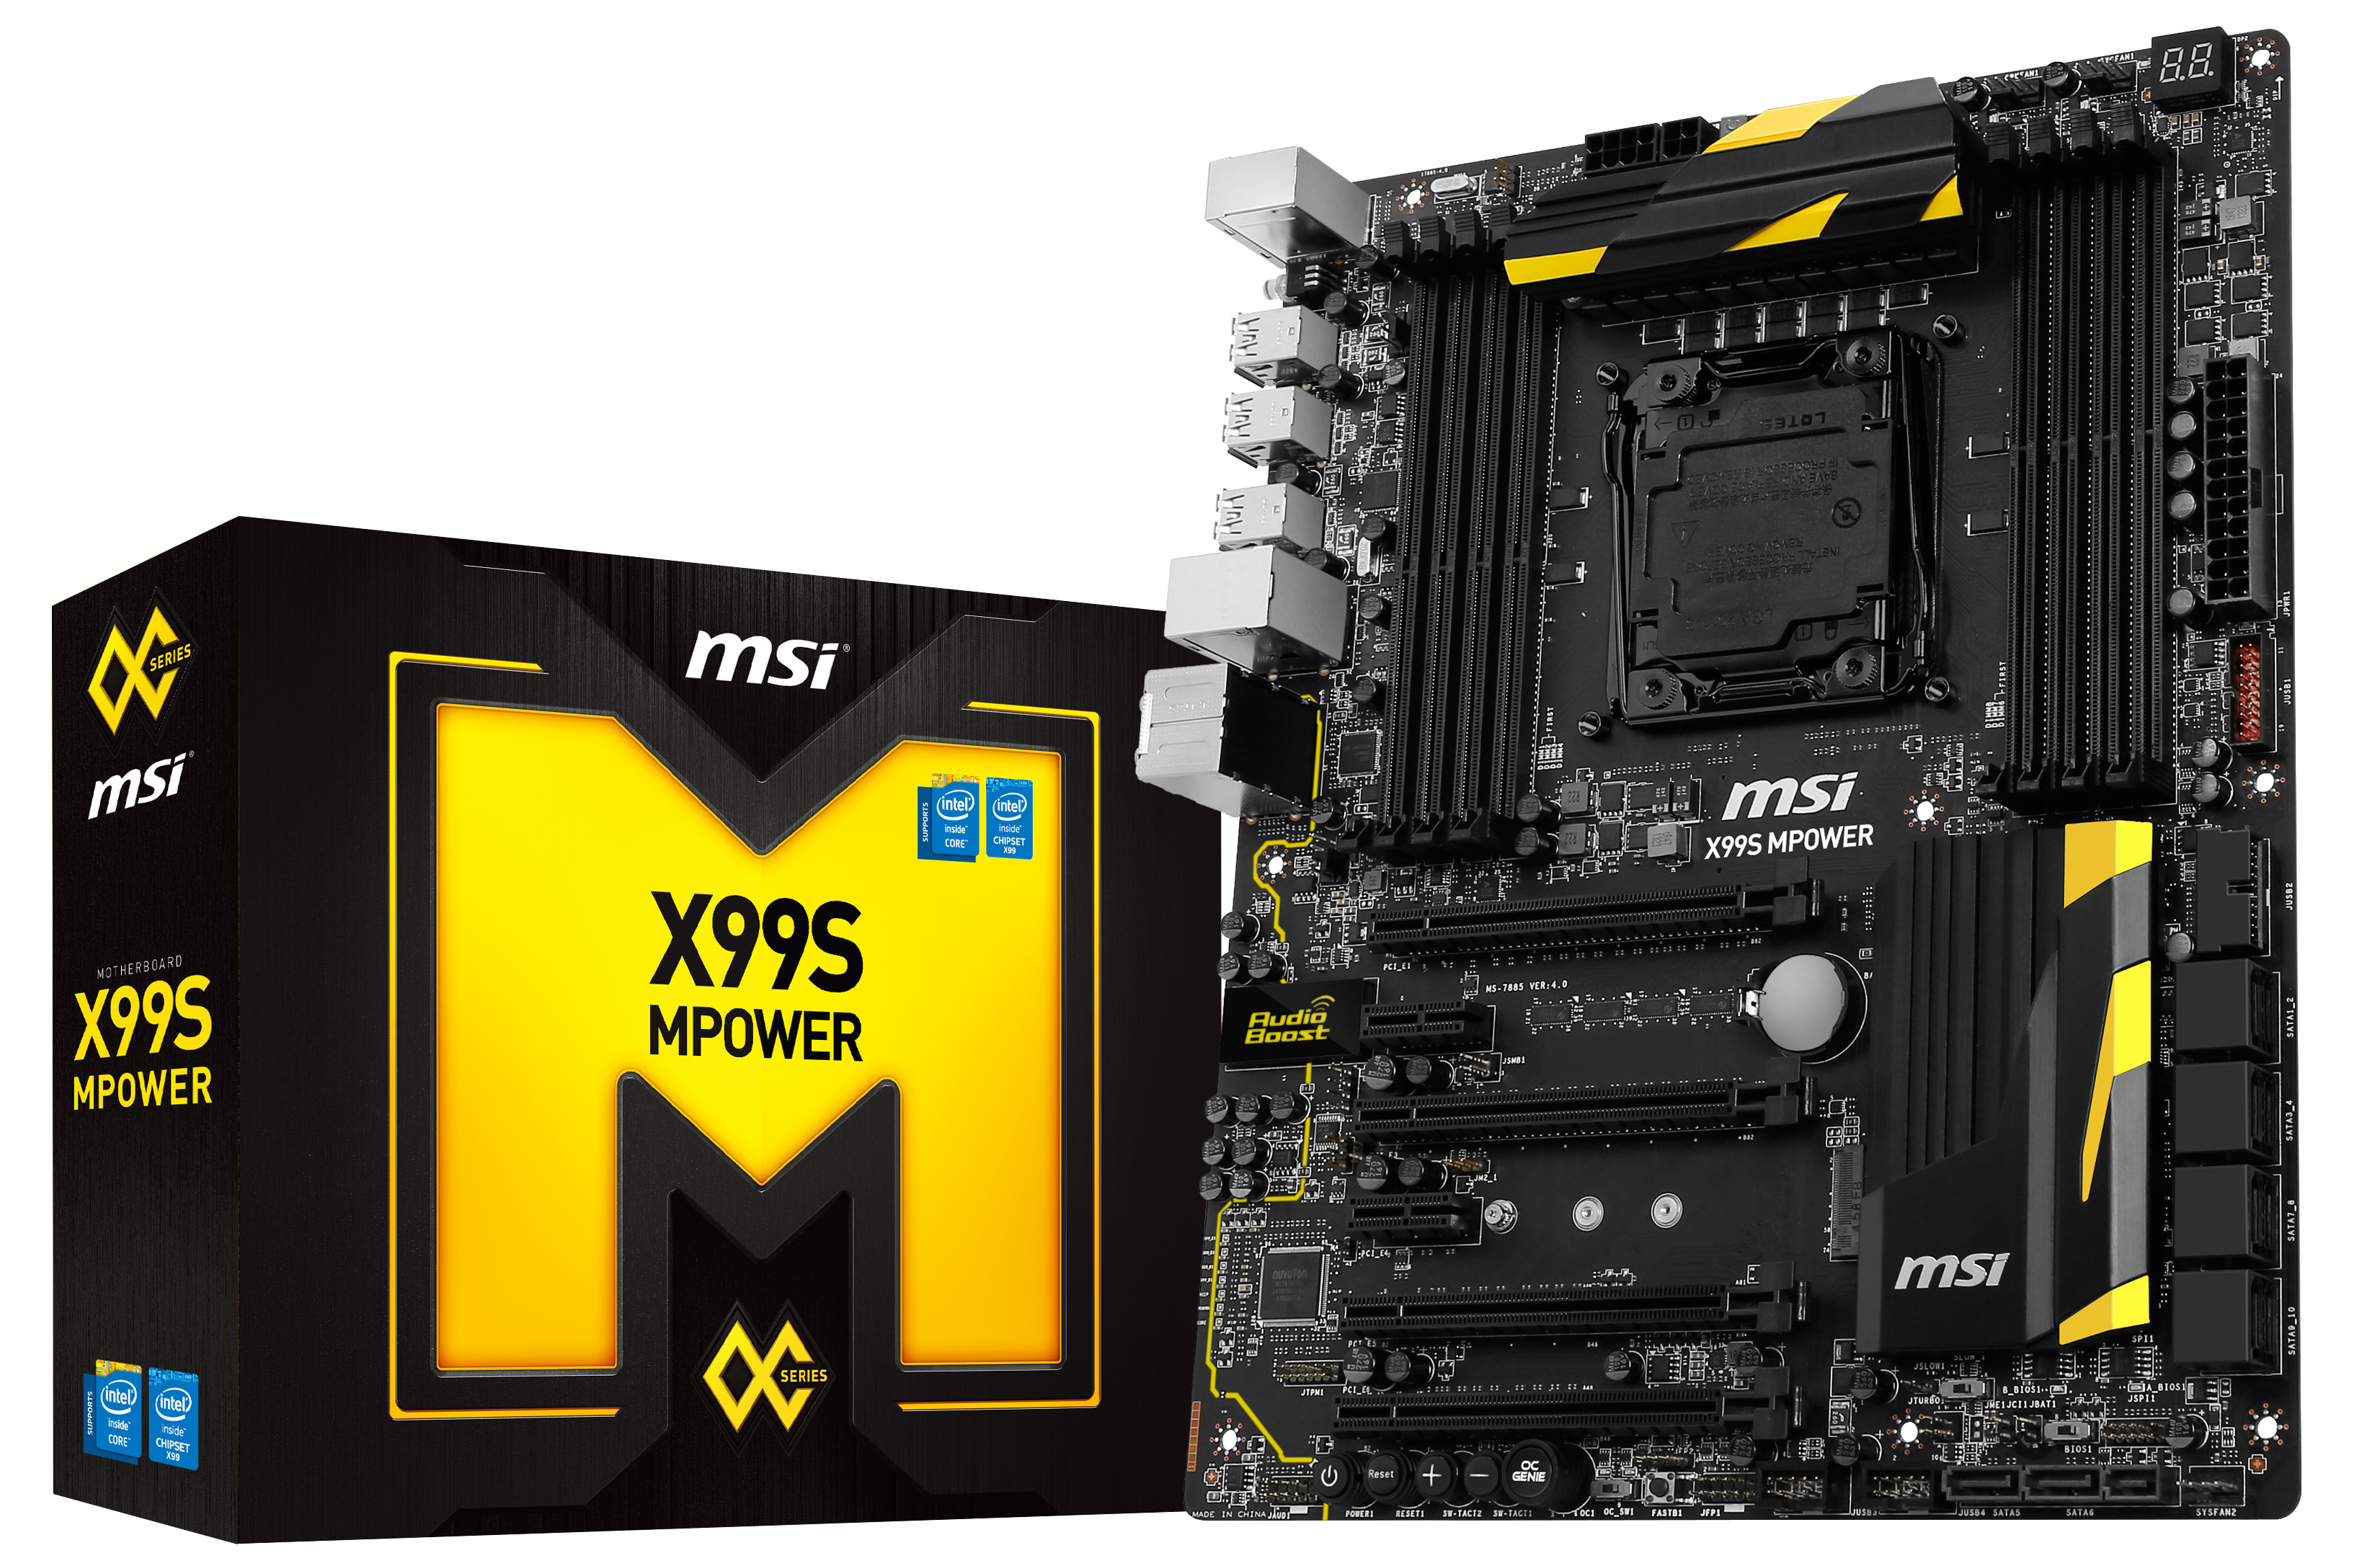
The MSI X99S MPower attacks this angle with a yellow and black color scheme (or as I read once, like a bee or police warning tape) at $300, making use of onboard OC buttons and an OC Genie button for overclocking. The rest of the motherboard comes with SATA Express, an M.2 PCIe 3.0 x4 port, extra USB 3.0 ports and an upgraded BIOS/software package from X79. The last MSI overclocking motherboard we tested, the Z97 MPower Max, was a nice product which we awarded and the X99S MPower wants to follow in that path.
Where MSI delivers is that the BIOS is easier to use than previous iterations, we get an XMP button in the BIOS to easily apply memory profiles and the overall aesthetic of the design which is something a user can build around to style their system. In our benchmark perspective, MSI performs similarly to other X99 products but does not enable multicore turbo, keeping it in the lower (but more common) performance bracket when at stock speeds.
However, there are a couple of downsides for comparison. Firstly, even at $300 it ends up approaching the mid-range pricing for X99. The Z97 model incorporated combined air/water cooling on the power delivery for less, for example. One of my big issues is that OC Genie, which we get a toggle switch for two modes this time around, is still that it does not push the CPU that much. MSI lacks a testing tool for overclocking and provides only a couple of presets, both of which give only a basic overclock. Another point of contention is that the bundled software offers a chance to overclock the CPU to 2.1 volts in plain daylight, which is asking for trouble.
The $300 price point is actually quite aggressive for X99, and along with the other motherboards we have reviewed the MSI still has a few (easily fixable) issues and doesn't push the boat in terms of technology but it ran through our suite without any issues.
Visual Inspection
Unlike the red of most motherboard gaming ranges, overclocking colors vary from company to company. In one corner we have red, another orange, a strong yellow and muted yellow, with MSI taking the last one on that list. It is clear they want to push a combination of black and yellow, because these two together signifies danger, or something similar. The amount of yellow on the MSI OC Certified range is along similar lines to that of MSI’s GPU Lightning range as well.
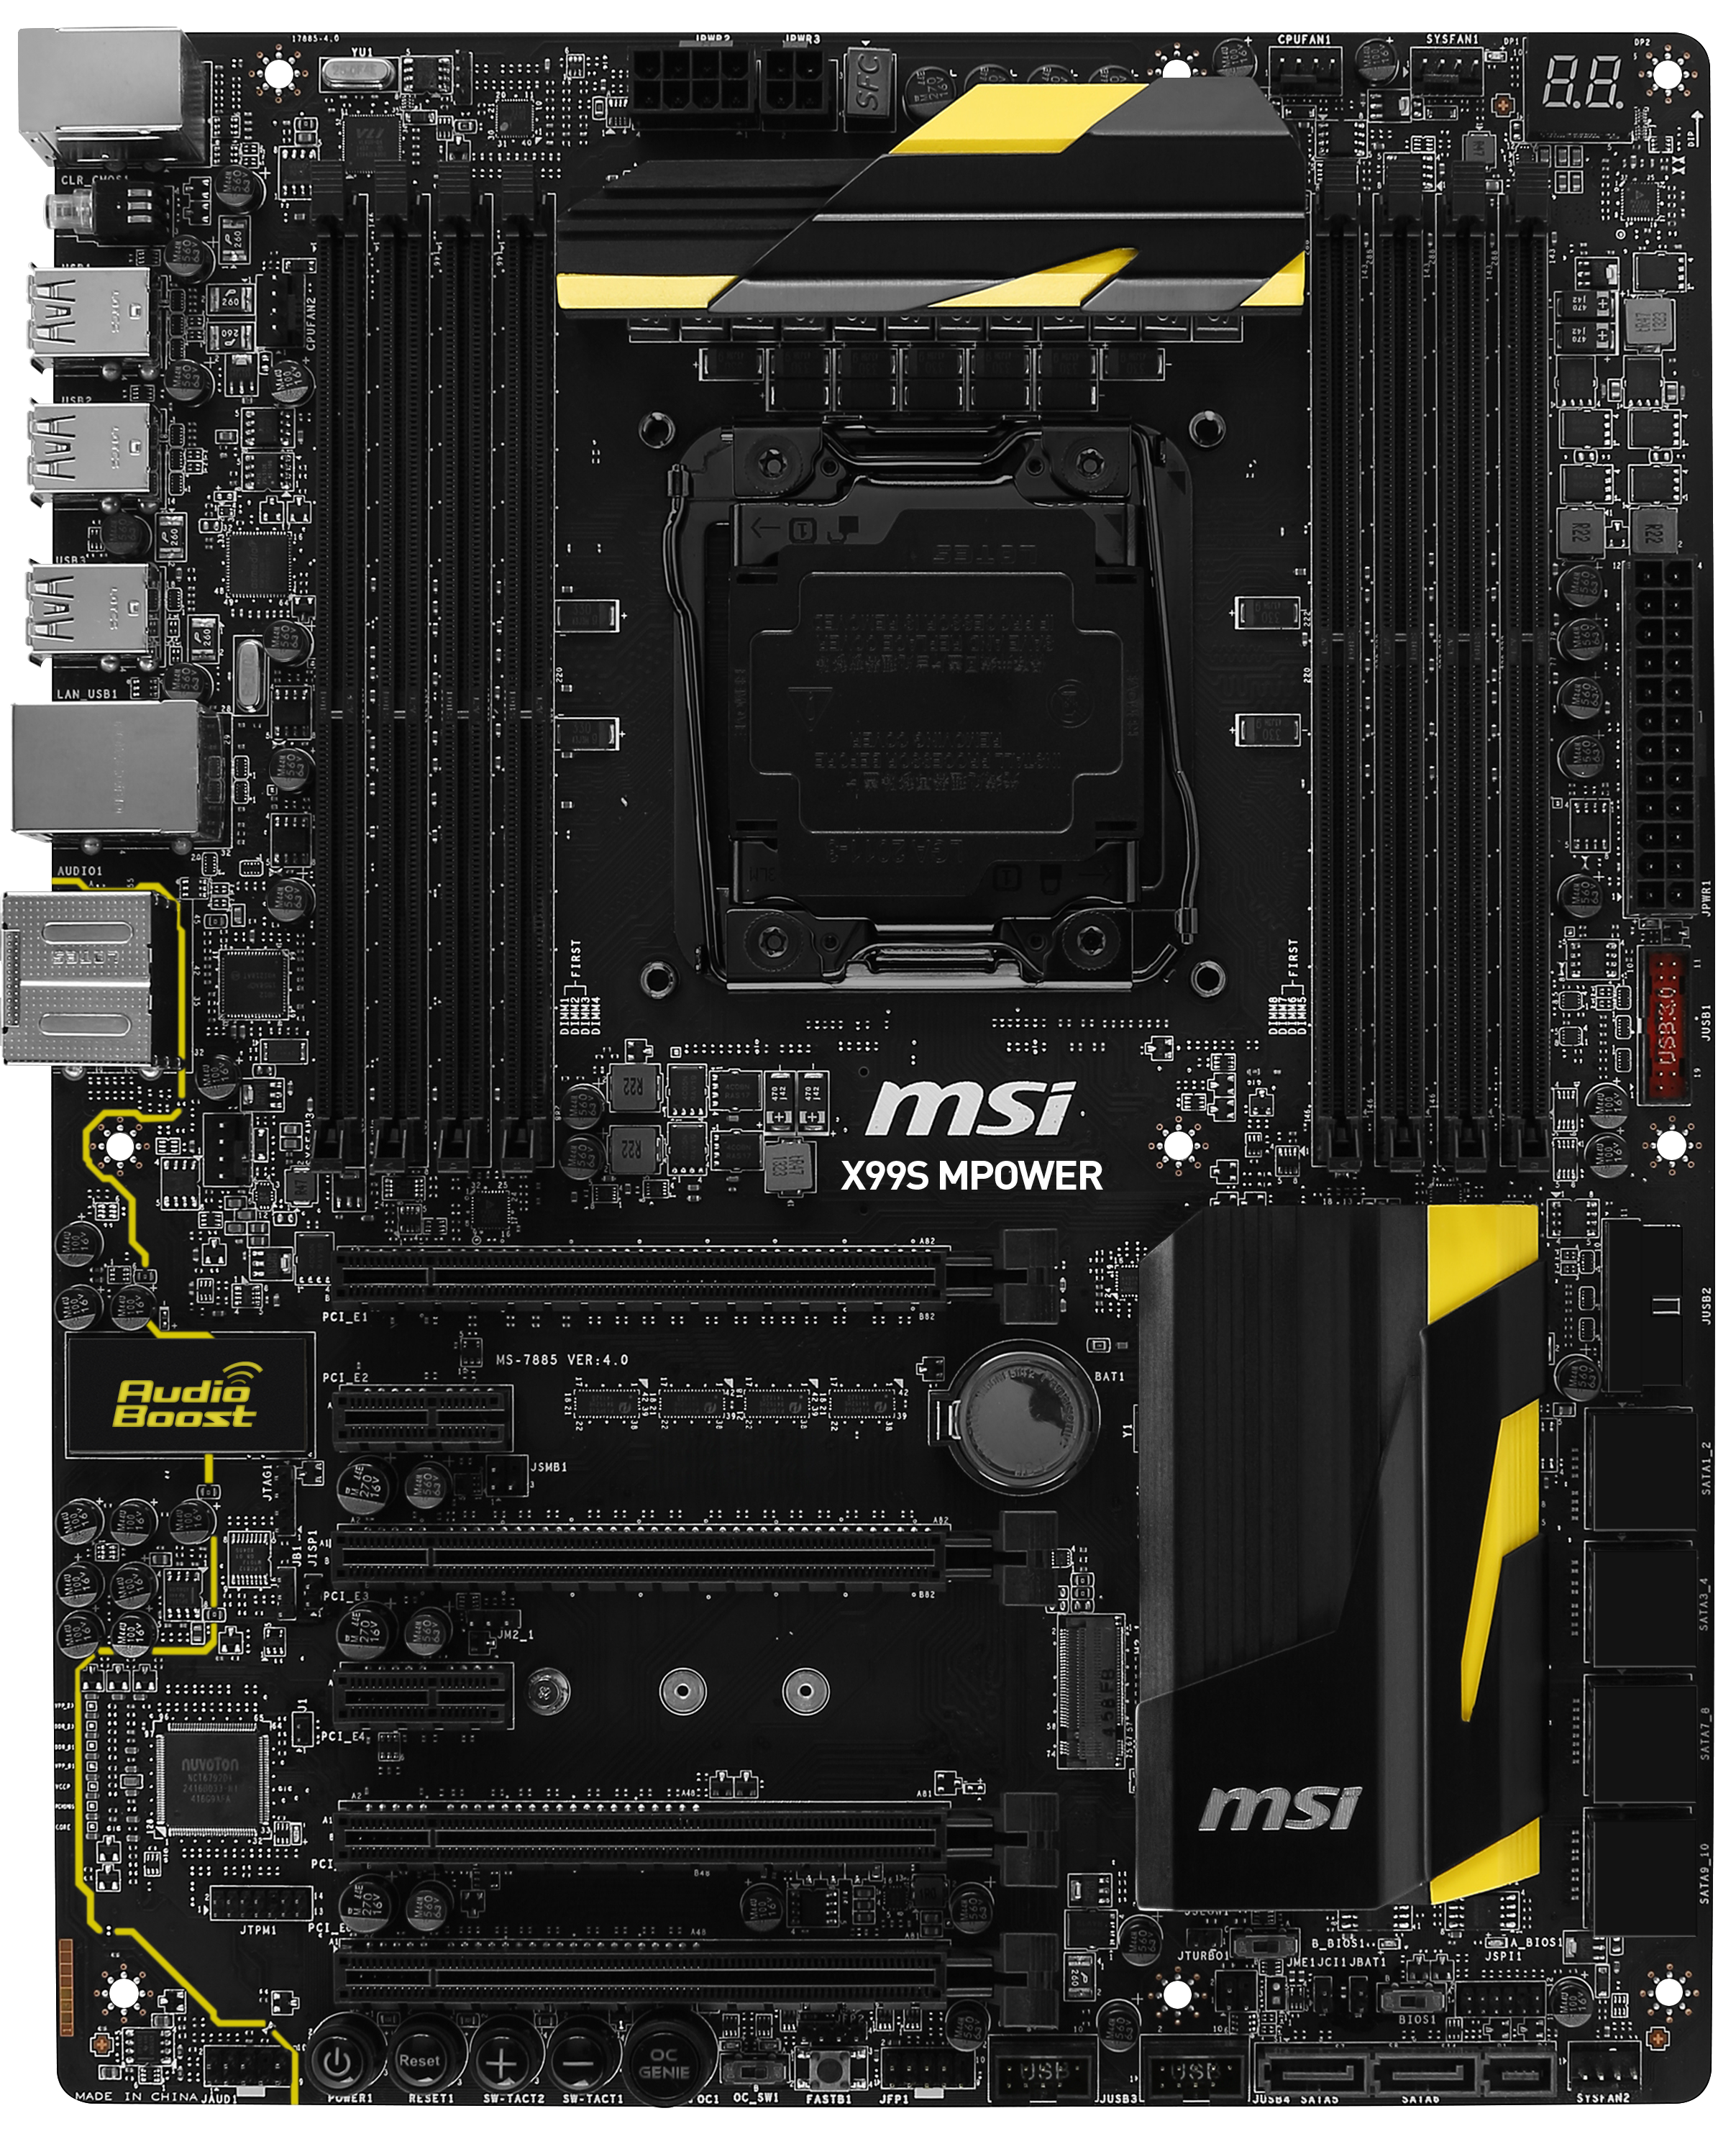
The X99S MPower uses a slightly modified CPU socket bracket which removes some of the elements to the rear side, allowing the socket area to be insulated better for sub-zero overclocking and attract less condensation with fewer metallic elements. The board has a full set of two-DIMMs per channel for memory, and although the slots are all black there is an easy-to-read guide on the board itself showing which DRAM slots to occupy first. Above the socket is our enhanced power delivery, and to keep costs down compared to the high end models the power delivery heatsink is not connected to the chipset heatsink. The socket area has easy access to four of the five onboard headers – two 4-pin CHA fans to the left of the DRAM, a 4-pin CPU at the top right, a 4-pin SYS at the top right also and a final 4-pin in the bottom right.

In the top right along with the fan headers is a two-digit debug display, useful for diagnosing boot-up issues. The power/reset buttons have been moved to the bottom of the board, which some manufacturers now prefer as the top of the board can get quite cold when sub-zero overclocking takes place over an 8-12 hour session. Below the debug display are the 24-pin ATX power connector and a USB 3.0 header sticking out of the board. This header is available for fast charging, hence the red color inside the header. We have another USB 3.0 header below this, at right angles to the motherboard and enabling cases that have four USB 3.0 ports on them. This is followed by our SATA ports, and at the bottom is a SATA Express port (with two of the SATA) sticking out of the board.

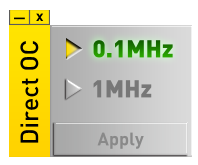
Along the bottom of the board are our power/reset buttons along with two DirectOC buttons. These adjust the BCLK frequency of the CPU in increments determined by the driver in Windows – either 1 MHz or 0.1 MHz. The OC Genie button follows, along with a switch which adjusts the OC Genie mode between two different OC levels. We test both in the overclocking section later in the review. Also on the bottom is a FastBoot button to get into the BIOS, the front panel header, two USB 2.0 headers, a BIOS select switch and a slow mode switch.
The PCIe lanes are somewhat oddly organized, requiring the first two GPUs to go into the first two full length GPU slots. So for a 40 PCIe-lane CPU, we get x16/x16/x8/x8 where the first slot reduces to x8 when the third is occupied.

To add to the confusion, the M.2 slot can either be in PCIe 3.0 x4 mode from the CPU, or PCIe 2.0 x2 mode from the PCH. However the manual has a handy table to tell you what goes where for what:
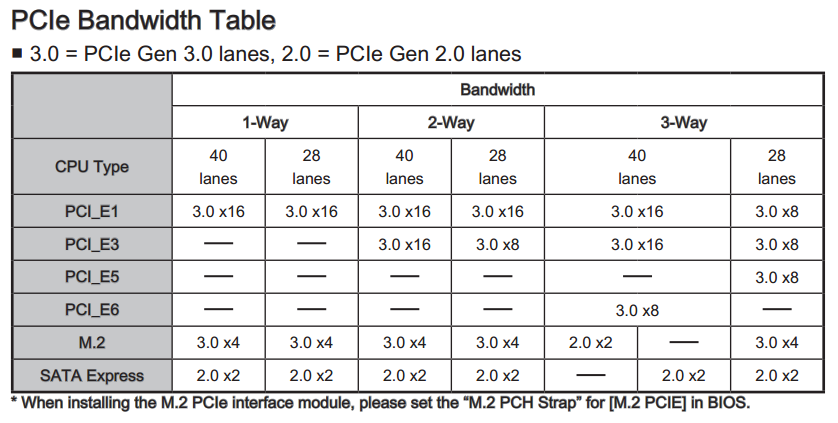
Essentially anything placed into the bottom full-length PCIe slot will reduce the M.2 slot down to PCIe 2.0 x2. Not shown in this table is a technical support for four-way GPU alignment, giving x16/x8/x8/x8, although single slot cards/PCIe ribbon cables would be required.
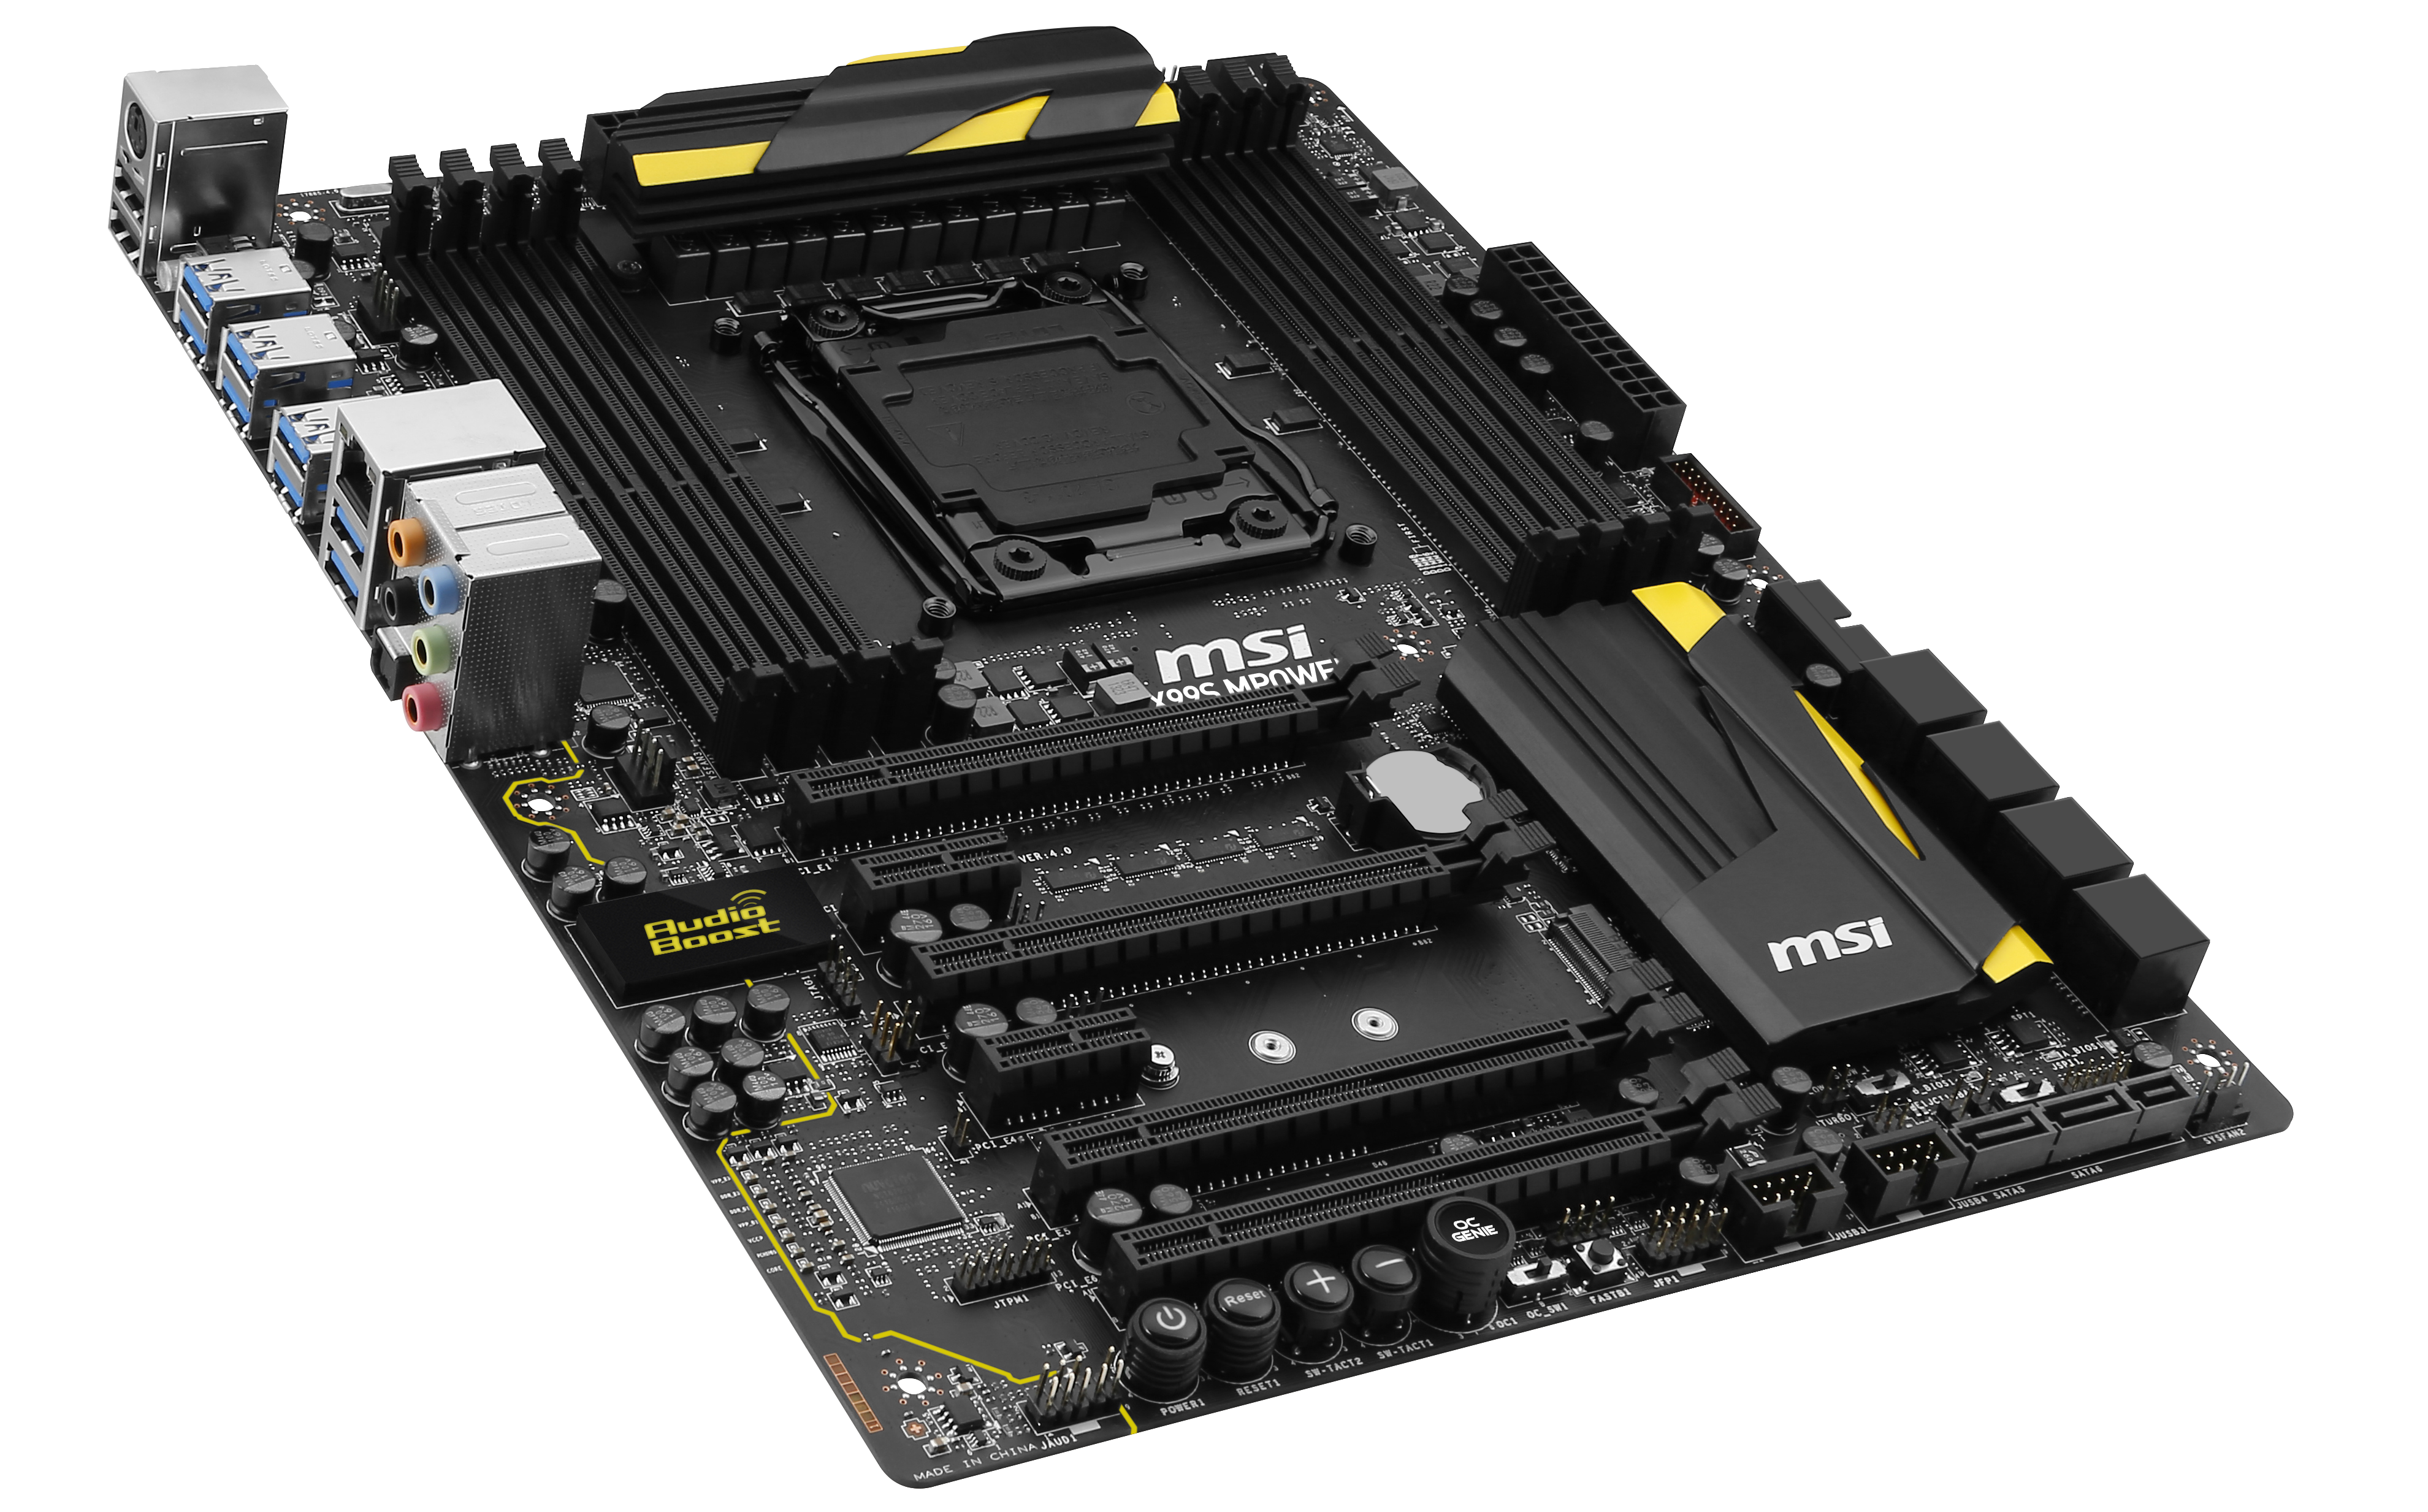
The left hand side of the board features MSI’s Audio Boost, which is an upgraded version of Realtek’s ALC1150 audio codec with an EMI shield, PCB separation and additional filter caps.
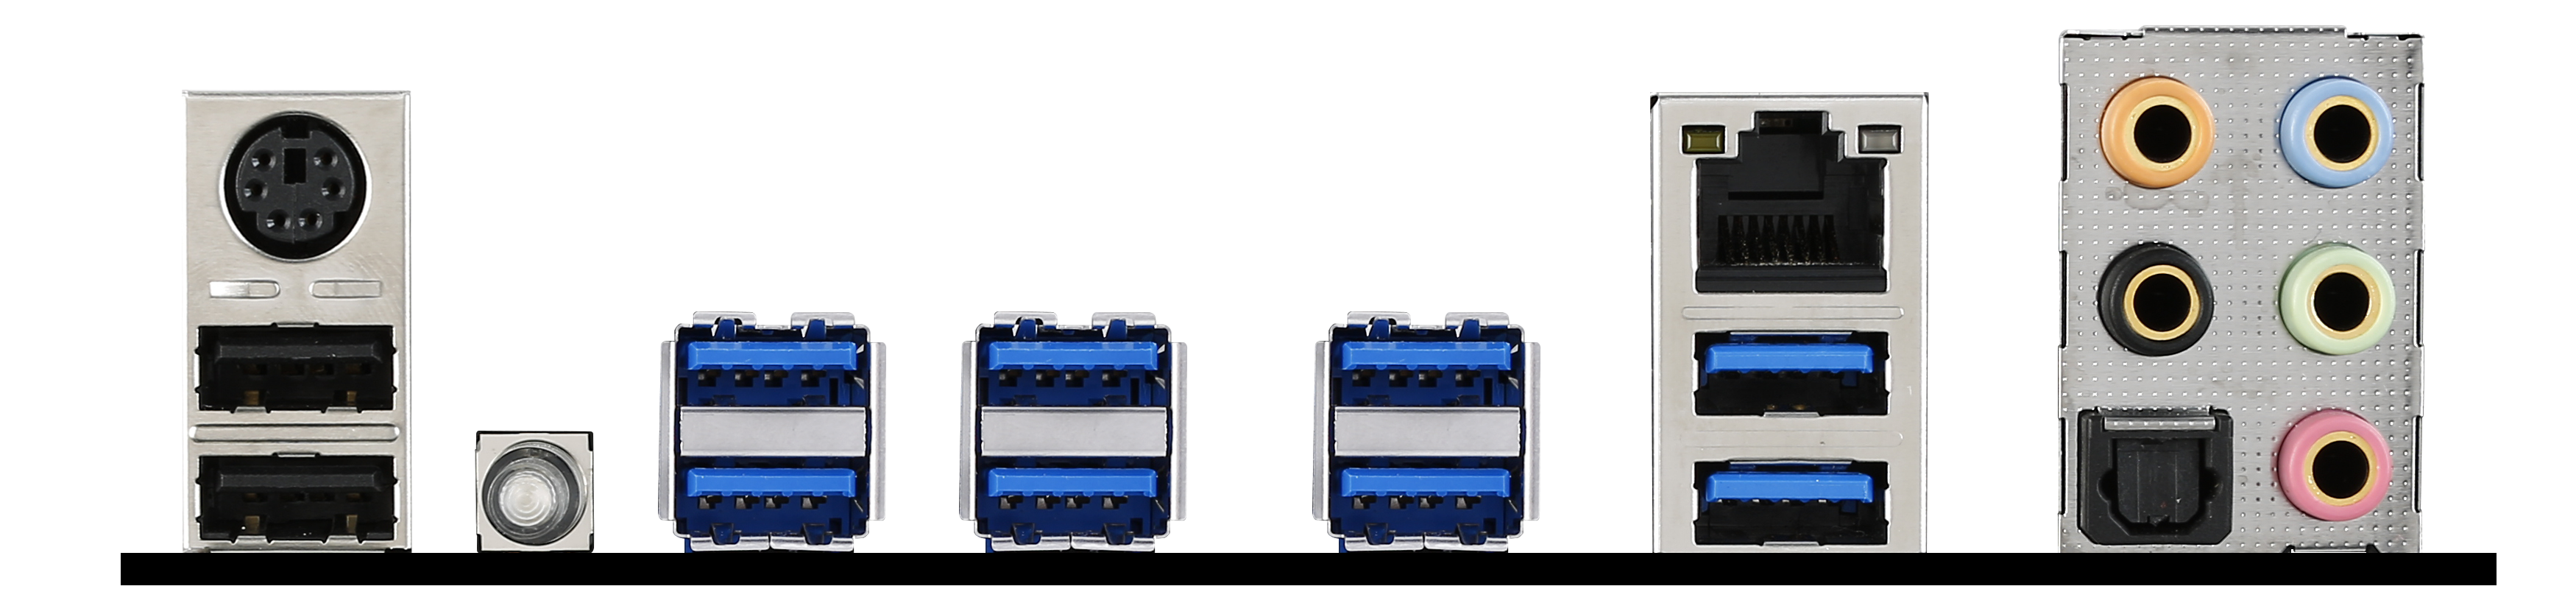
The rear panel of the board gives a combination PS/2 port (in black), two USB 2.0 ports, four USB 3.0 ports from the chipset, four USB 3.0 ports from a VIA VL805 controller, an Intel I210 network port and audio jacks.


Board Features
| MSI X99S MPower | |
| Price | US (Amazon) |
| Size | ATX |
| CPU Interface | LGA2011-3 |
| Chipset | Intel X99 |
| Memory Slots | Eight DDR4 DIMM slots Supporting up to 64 GB UDIMM, 128GB ECC RDIMM Up to Quad Channel, 1600-3333 MHz UDIMM |
| Video Outputs | None |
| Network Connectivity | Intel I210 |
| Onboard Audio | Audio Boost (upgraded Realtek ALC1150) |
| Expansion Slots | 2 x PCIe 3.0 x16 2 x PCIe 3.0 x8 2 x PCIe 2.0 x1 |
| Onboard Storage | 6 x SATA 6 Gbps, RAID 0/1/5/10 4 x S_SATA 6 Gbps, no RAID 1 x SATA Express 1 x PCIe 3.0 M.2 x4, also runs at PCIe 2.0 M.2 x2 and M.2 SATA M.2 supports 2242/2260/2280 sizes |
| USB 3.0 | 6 x USB 3.0 from PCH, 4 back panel + 1 header 4 x USB 3.0 from VIA VL805, back panel 2 x USB 3.0 from ASMedia ASM1042AE, header |
| Onboard | 10 x SATA 6 Gbps ports 1 x SATA Express 1 x M.2 (PCIe 3.0 x4 or PCIe 2.0 x2 depending on setting) 2 x USB 3.0 Headers 2 x USB 2.0 Headers 5 x Fan Headers TPM Header Power/Reset Buttons Base Clock Control Buttons OC Genie Button OC Genie Switch Multi-BIOS Switch Slow Mode Switch Front Panel Header Front Audio Header |
| Power Connectors | 1 x 24-pin ATX 1 x 8-pin CPU 1 x 4-pin CPU |
| Fan Headers | 2 x CPU (4-pin) 2 x SYS (4-pin) |
| IO Panel | 1 x Combination PS/2 Port 2 x USB 2.0 4 x USB 3.0 (PCH) 4 x USB 3.0 (VIA) 1 x Intel Network Port Clear CMOS Button Audio Jacks |
| Warranty Period | 3 Years |
| Product Page | Link |
MSI X99S MPower BIOS
Very few changes from our last MSI X99 BIOS overview are present in the X99S MPower, and thus for completeness our analysis is included here with minor changes to represent the differences for MSI's OC Certified range.
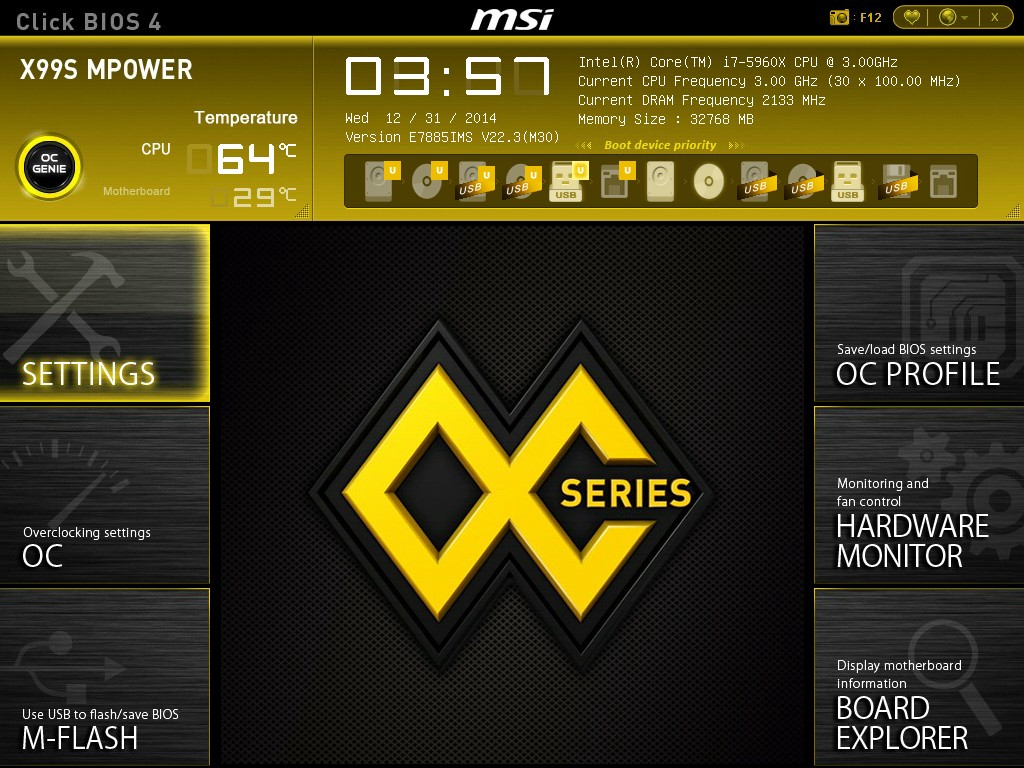
The basic outline of the MSI BIOS has not changed that much since the introduction of the graphical BIOS however its implementation has significantly improved. We do not get much more over MSI’s Z97 series - only those options related to X99 are added. The layout is such that a persistent top ribbon is present indicating the motherboard being used, the BIOS version, the CPU installed, the CPU frequency, the memory size, the memory speed and the system temperatures. There is perhaps some whitespace here for some fan speeds as well. (Ignore the CPU temperature listed - I started taking these images without my CPU fan attached and the system eventually overheated. After spending 10 minutes wondering what the problem was, then facepalming, the temperature settled for the last few images. No damage was caused by the overheating as the automatic shut off worked great.)
Note that we don’t have the XMP button similar to Z97. This is because when using a kit without an XMP profile, the button disappears, but it is present on X99 when the appropriate kit is used. I would rather MSI still had the button present, but it was greyed out to indicate it was unavailable.
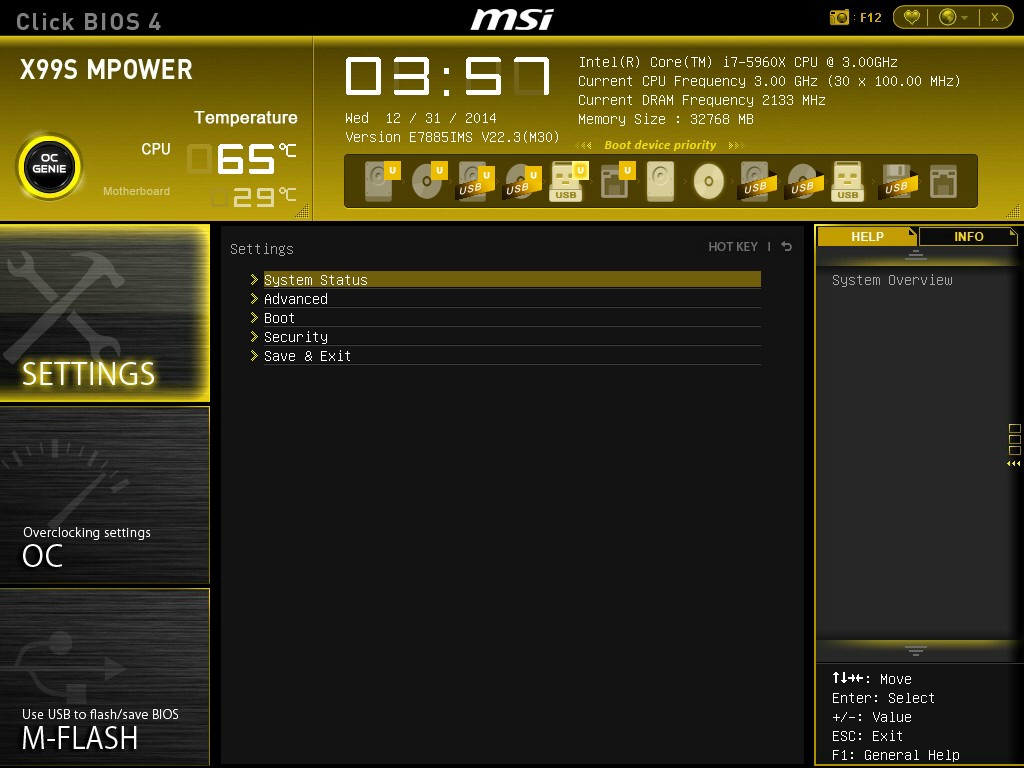
MSI’s system splits the BIOS up into two main areas – Settings and Overclocking. The Settings menu again subdivides into the System Status, Advanced, Boot, Security and Save & Exit.

For users wanting to adjust the PCIe bandwidth or disable the extra controllers, the Advanced menu gives all these options in separate sub-menus.

For example, in the PCIe Subsystem menu, the M.2 slot can be configured for both PCIe M.2 and SATA M.2 drives.
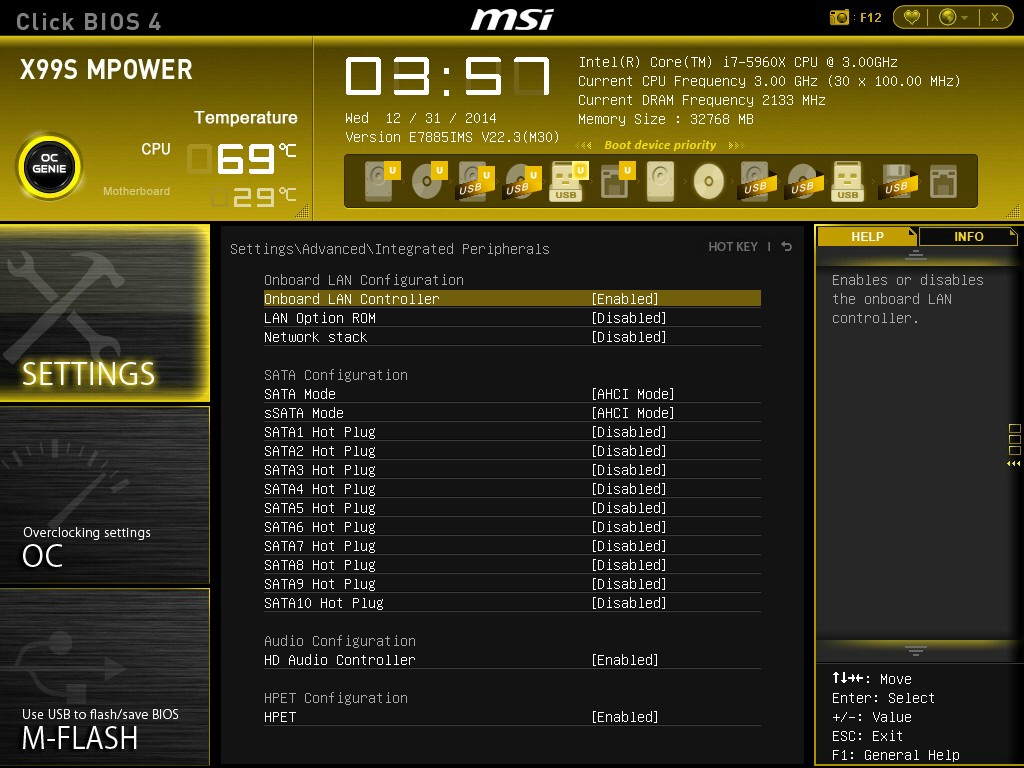
The Peripheral menu has the Hot Plug options for all the SATA ports. As with the other motherboards, the SATA ports are RAID capable but the sSATA are not, due to two AHCI controllers being present in the PCH with different functions. Unfortunately MSI does not distinguish here which ports are RAID capable and which are not – for reference SATA ports 1-6 allow RAID 0/1/5/10.
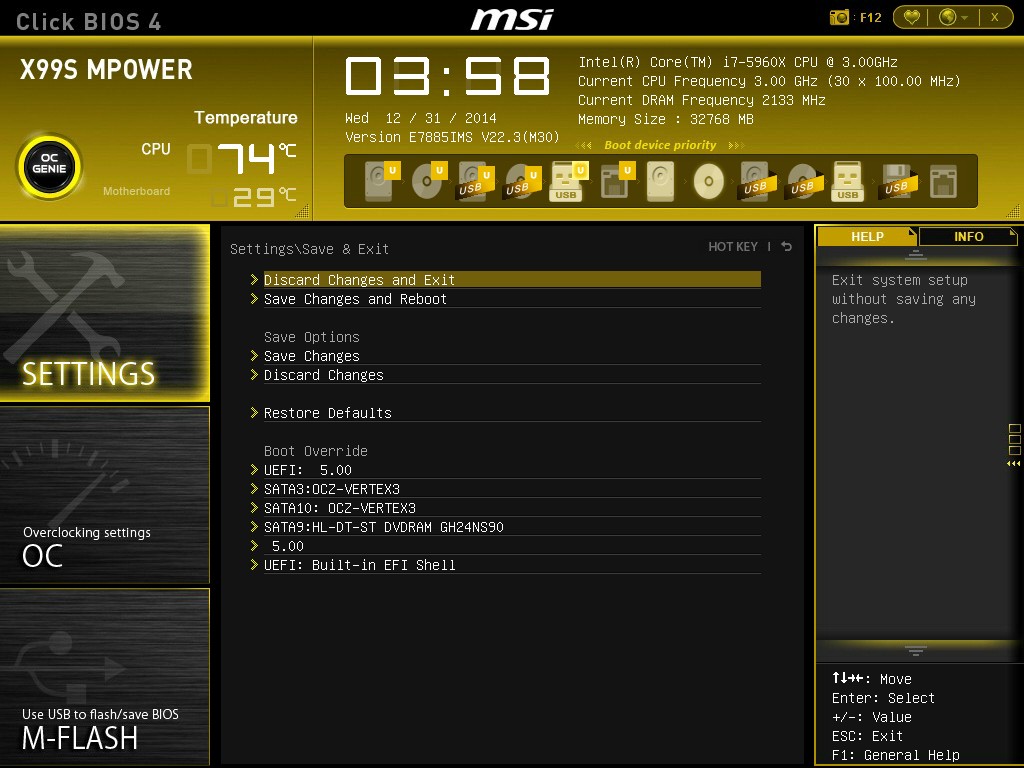
The other item of note in the Settings tab is that the user can issue a one-time boot override to a storage device of their choice:
The OC Menu is almost identical to Z97, allowing both a simple mode and an advanced mode:
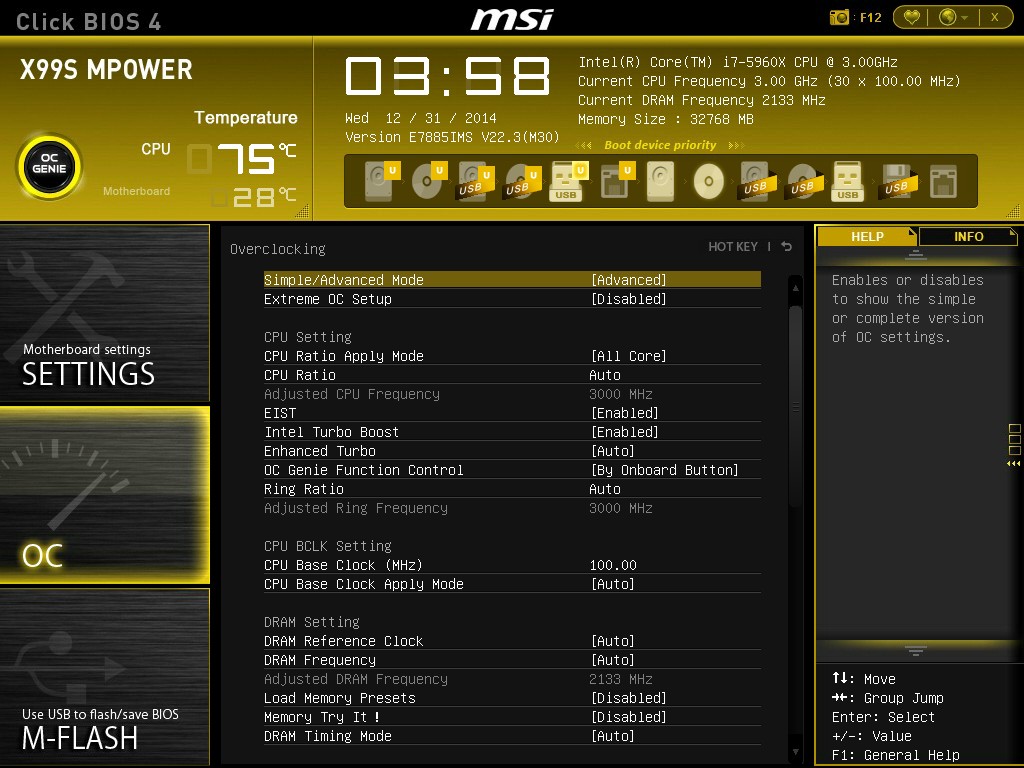
Thankfully MSI has decided to keep the new arrangement of overclocking options, starting with CPU/BCLK, DRAM, Voltage and then others:

Advanced mode opens up a larger selection of options for experienced overclockers who are used to them. Users can also select when an enhanced BCLK overclock is applied (either before POST or after), and the Mem Try It option provides a couple of options for attempting to tighten up memory timings. As this is the overclocking model of the range, features such as advanced memory OC options for users with special or rare kits are provided:

The DRAM options allow for control over the sub-timings, and it is good to see that the current timings are shown alongside the option to adjust them.

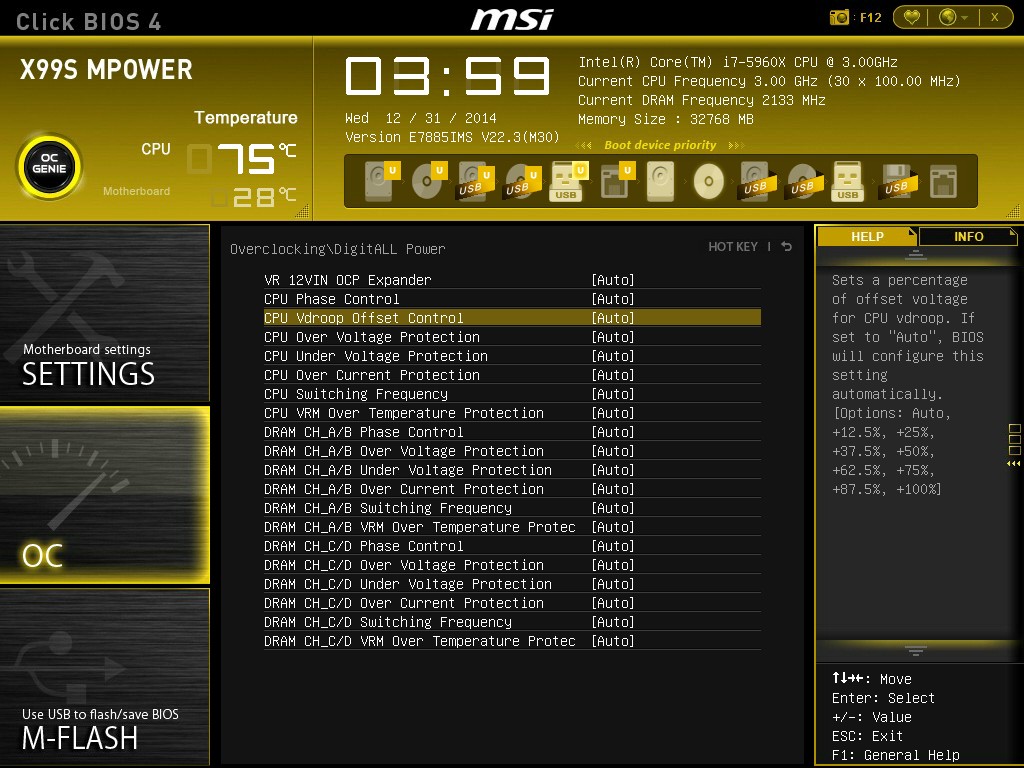
Unfortunately the Load Line Calibration issue with MSI motherboards rears its head again. Under the digital power menu, it gives an option for CPU VDroop Offset, and allows the user to set ‘Auto, +12.5% - 100%’, but does not inform the user which way around it should be for a constant voltage response. Other motherboard manufacturers have this option sorted by either providing a graph or renaming the options to ‘Auto, Low, Medium, High, Turbo, Extreme’. MSI could learn a trick or two in this instance.
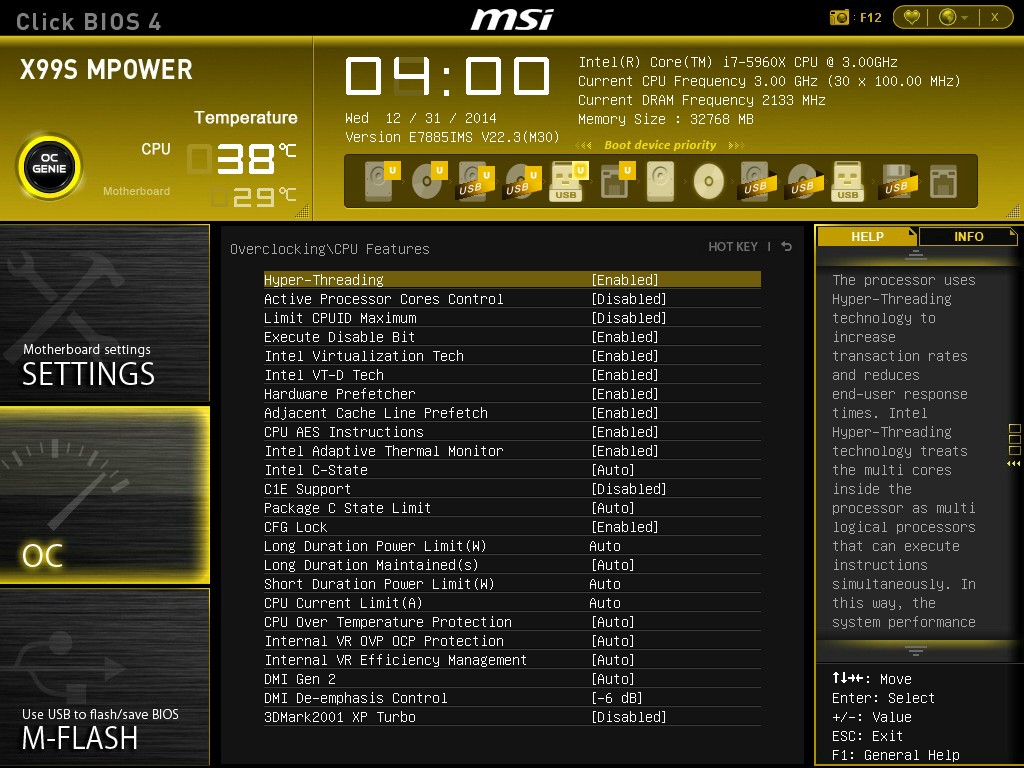
The OC menu also allows users to see the SPD information of the DRAM and adjust various aspects of the CPU features:
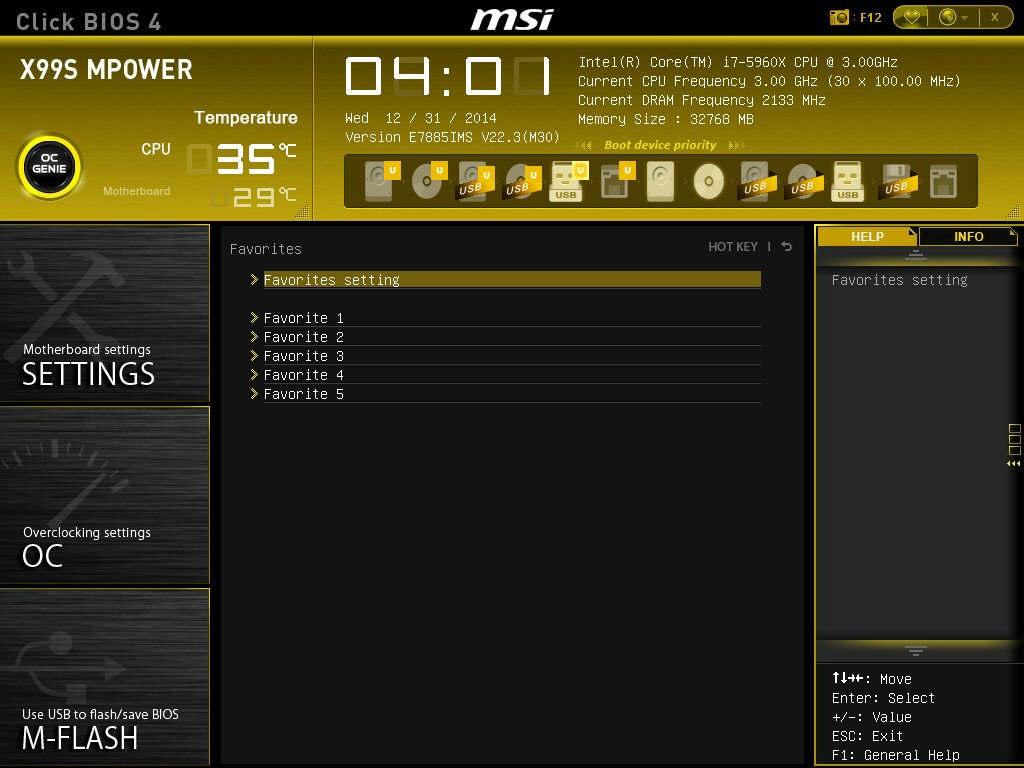
Alongside the Settings and OC tabs, the BIOS offers the M-Flash tool to update to the latest BIOS, overclocking profiles that can be saved and reloaded, a favorites menu for users to assign options they are used to (although not particularly needed with the new aligned OC menu) and also adjust the entry point of the BIOS.
The Hardware Monitor tab gives the fan options, which in recent generations has been substantially upgraded to some of the best we have ever seen.
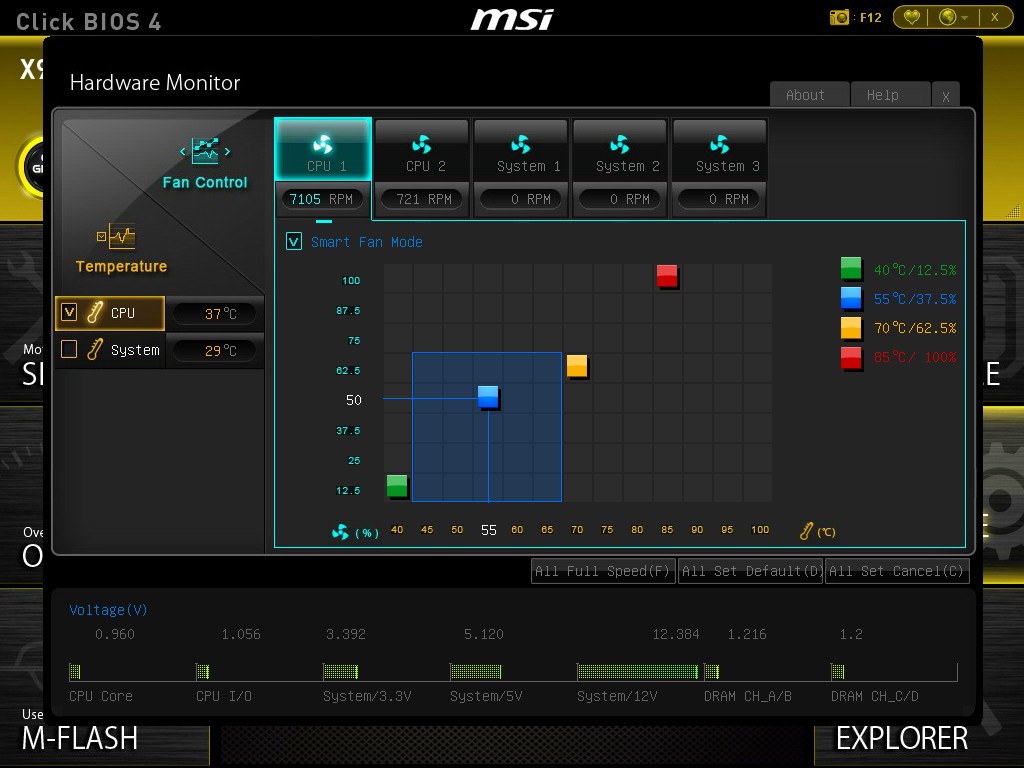
When the Graphical BIOS nomenclature was introduced, the ‘graphical’ part was designed to help the user experience and interactivity with what are normally mundane options. The fan controls are a perfect example – a user should be able to see a multipoint gradient graph and adjust it using the mouse, rather than fiddling with menu options. MSI’s graph adjustments are not as finely grained as some other manufacturers, but the user experience is right on the money. MSI now needs to introduce some internal testing functionality so that the system can test the fan and adjust the scale on the graph appropriately for the fan response.
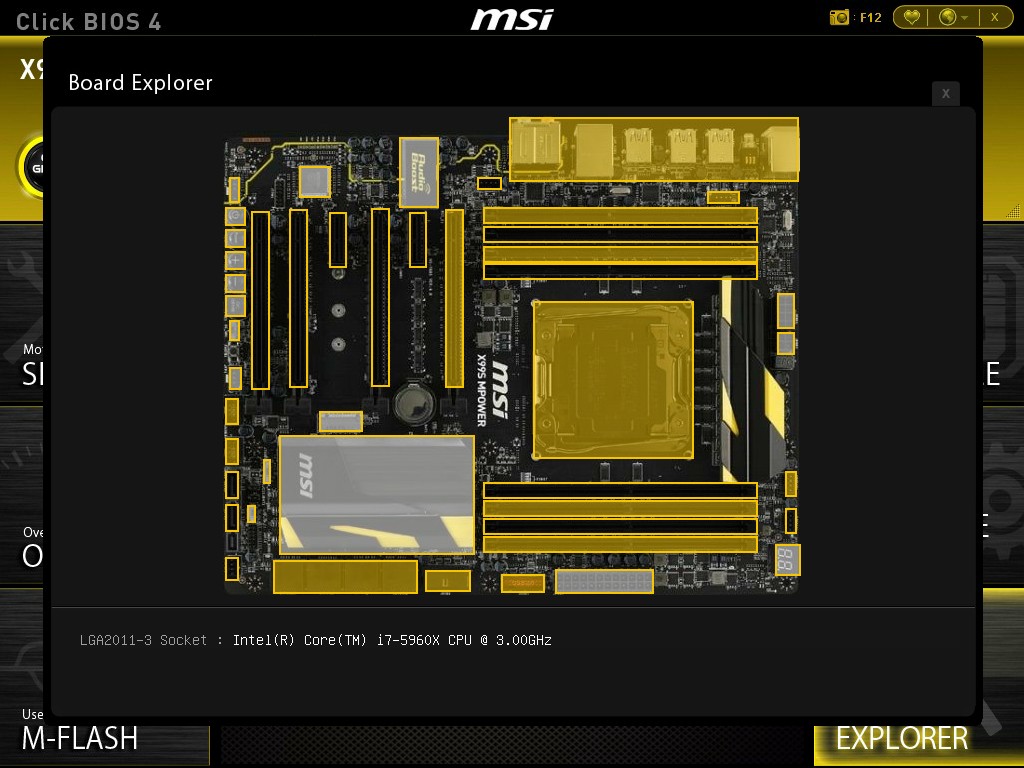
Similar to ASRock, we also get the Board Explorer functionality which allows the user to see what is installed. This is also useful if one stick of memory is not being seen or a PCIe device is not detected.


MSI X99S MPower Software
Over the last couple of generations, MSI’s main hub of options has switched from a combination of Control Center and MSI Suite to Command Center with a much cleaner interface and array of options. Before that, the driver disk offers some MSI branded wallpapers for installation along with the drivers and software:
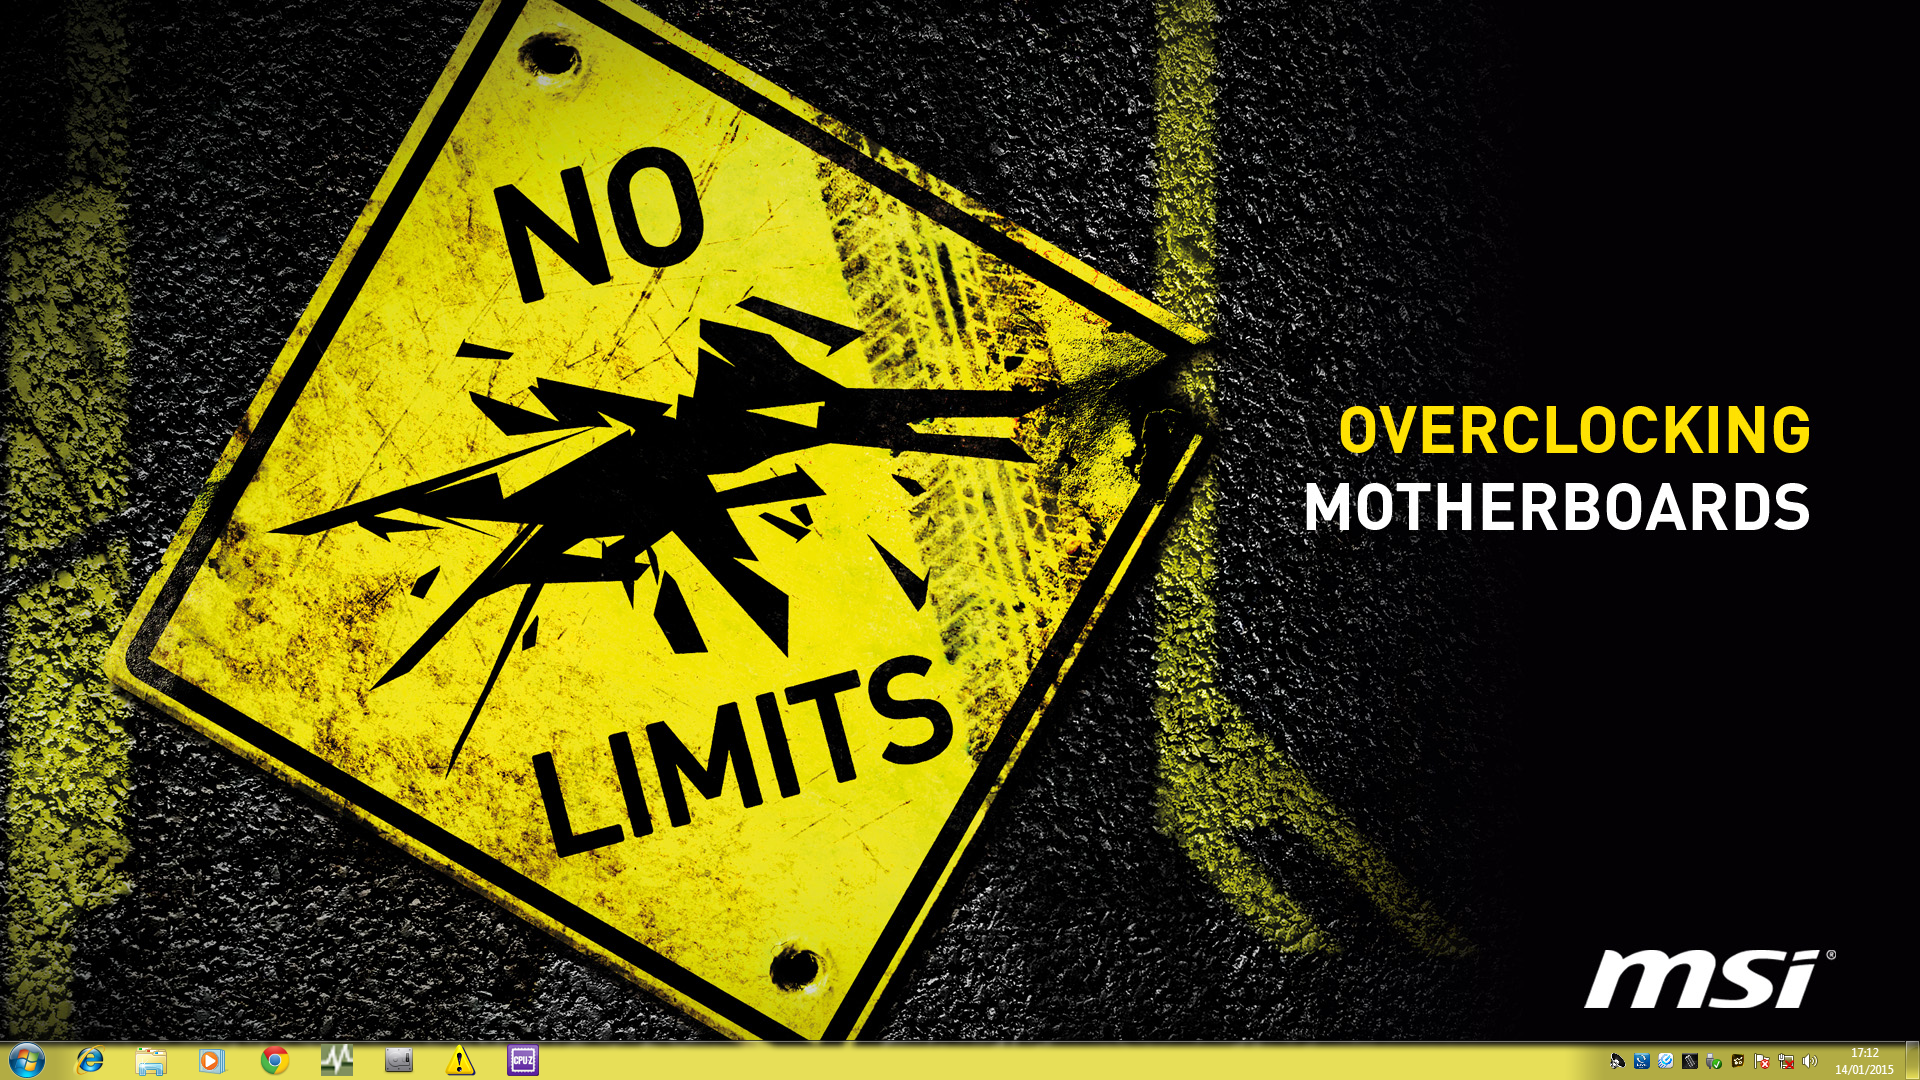
I am always up for a change in background to align with the products I have purchased, and this OC background catches the spirit nicely.
One of MSI’s recent pushes in software has been with the ECO Center, designed to help users disable certain parts of the motherboard to save power. This software is included in the package, despite the X99S MPower being part of the overclocking range.
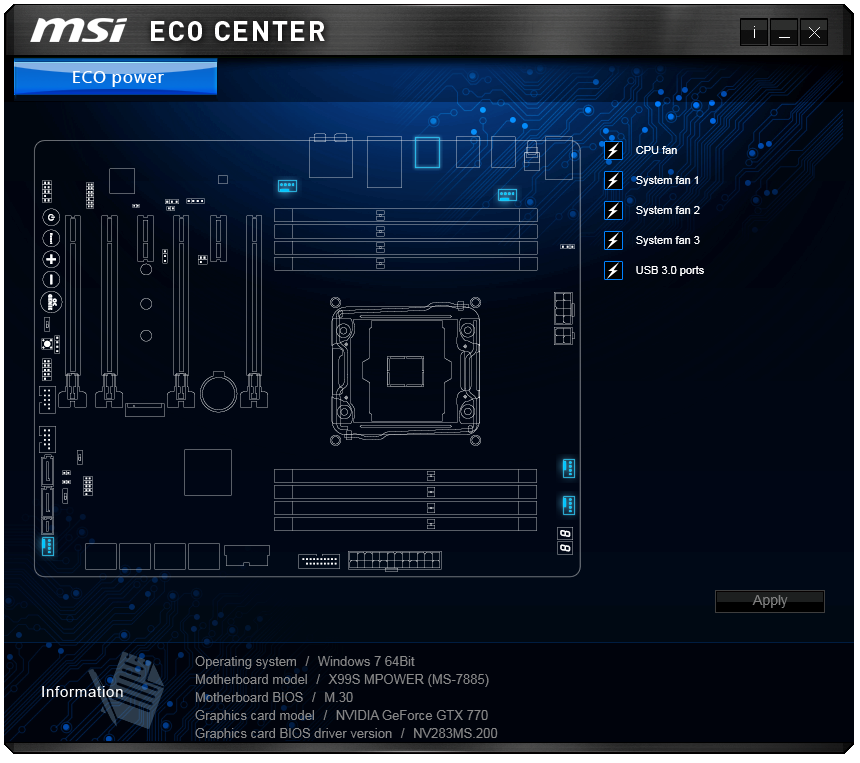
It is not advised to disable the CPU fan unless it is powered with a fan controller elsewhere! Perhaps MSI should add that as a warning next to that option. However saving the odd watt here or there might make a small adjustment to anyone’s electricity bill. I normally work along the line of 1W = $1/yr as a rough guide when I am energy saving, although local pricing might vary (I actually pay £0.15/kWh here).
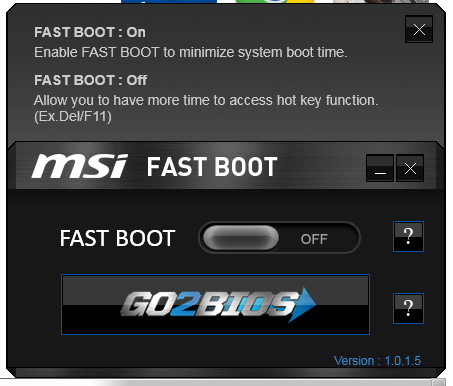
With the latest operating systems supporting UEFI fast booting methods, MSI has added an option to enable this feature along with a button to access the BIOS on the next reboot. Personally I find this a nice option to have, especially when overclock testing a new system – no more pressing DEL/F2 to get into the BIOS.
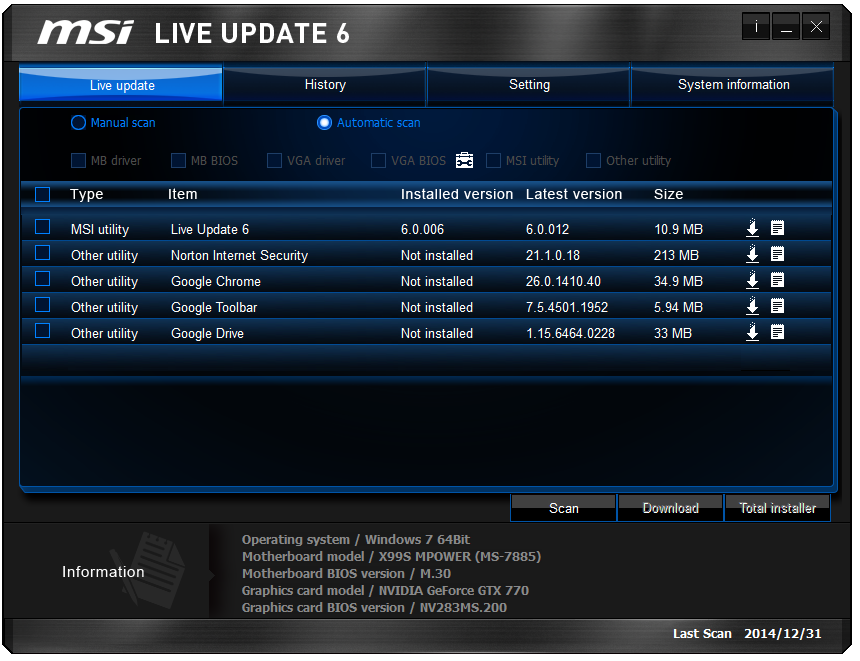
One of the cornerstones of the MSI software package is Live Update 6, which still holds the title as the best update package available on any motherboard. This downloads a list of what drivers/software should be on the motherboard and then compares it to what the user actually has. The ones that do not match are then offered as downloads, including sizes of download, and then the progress is shown as the updates are downloaded and installed. No other update package comes close, however there is one small issue. I would suggest to MSI to have an option to disable certain updates – I certainly do not want to download additional ‘Internet Security’ when I have my own preferred option on hand.
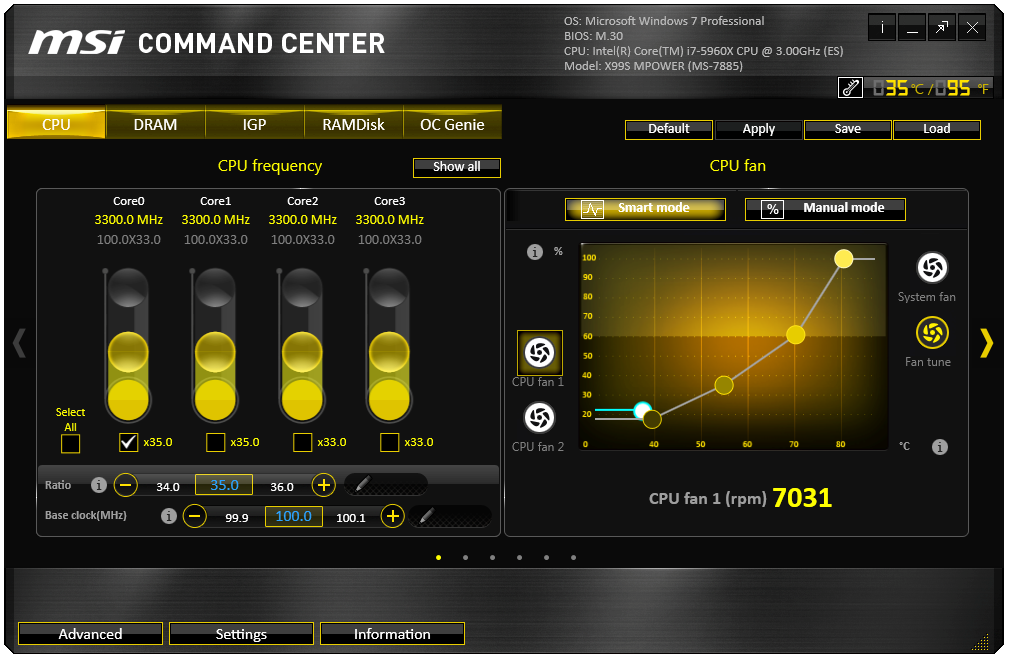
The Command Center software is where most of the regular action happens, with this front page showing which CPU is in use, what motherboard and BIOS version is in play and what operating system is installed. Here we also get quick access to CPU Multiplier and BCLK overclocks, as well as graphical CPU fan adjustment. The Fan Tune option allows the system to detect the fan power and speed response to help the user adjust the fans based on the dead zone in each.
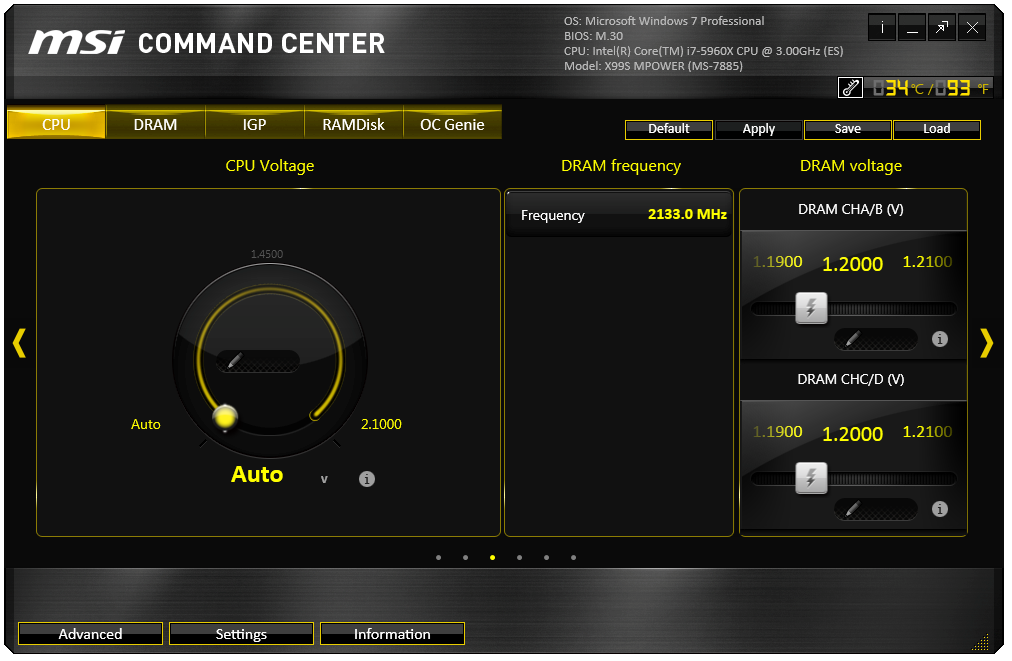
Unfortunately MSI has not fixed the error in Command Center I brought to their attention in the last generation – no user should be allowed the option to enable 2.1 volts to their processor. Not even extreme overclockers using liquid nitrogen will need (or can control) that much voltage, so it should not even be an option to regular users in the software without some big flashy warnings. Other manufacturers sometimes offer something similar, but they do not advertise 2.100 volts as the max on their sliders or dials, whereas for MSI it is staring the user right in the face. Come on MSI, step up the game and limit it to something more useful, such as +30% of stock voltage detected on the CPU.
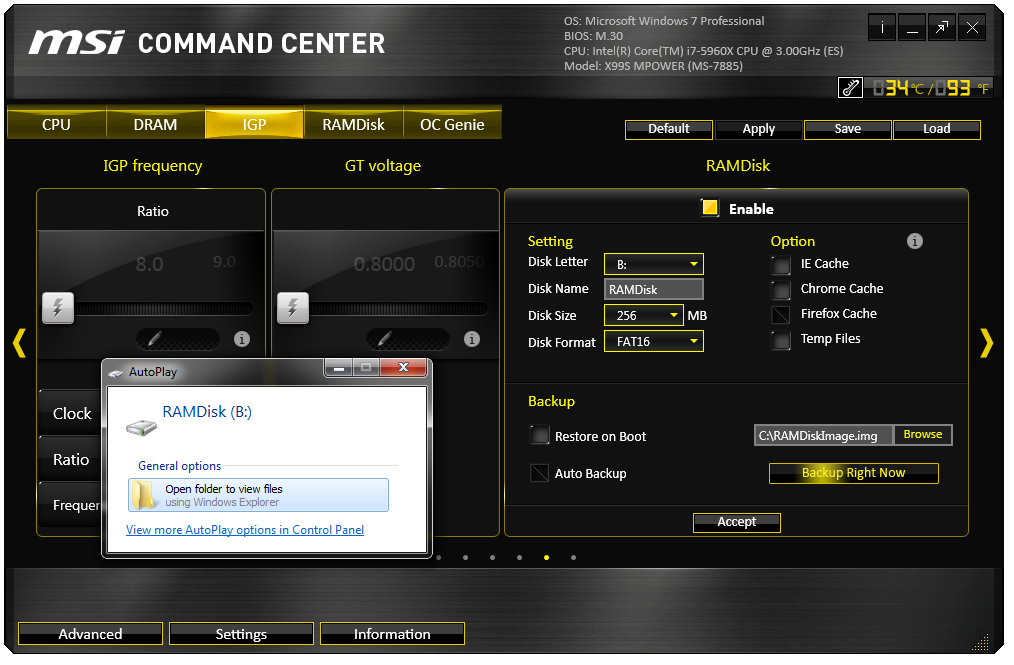
Command Center also allows a RAMDisk, although unlike ASRock’s implementation, the size of the RAMDisk is only limited by the drop down menu. Annoyingly the user has to enable the RAMDisk (which might take a minute) before re-enabling it with a new disk size other than 256 MB. This should be adjusted to improve the user experience.
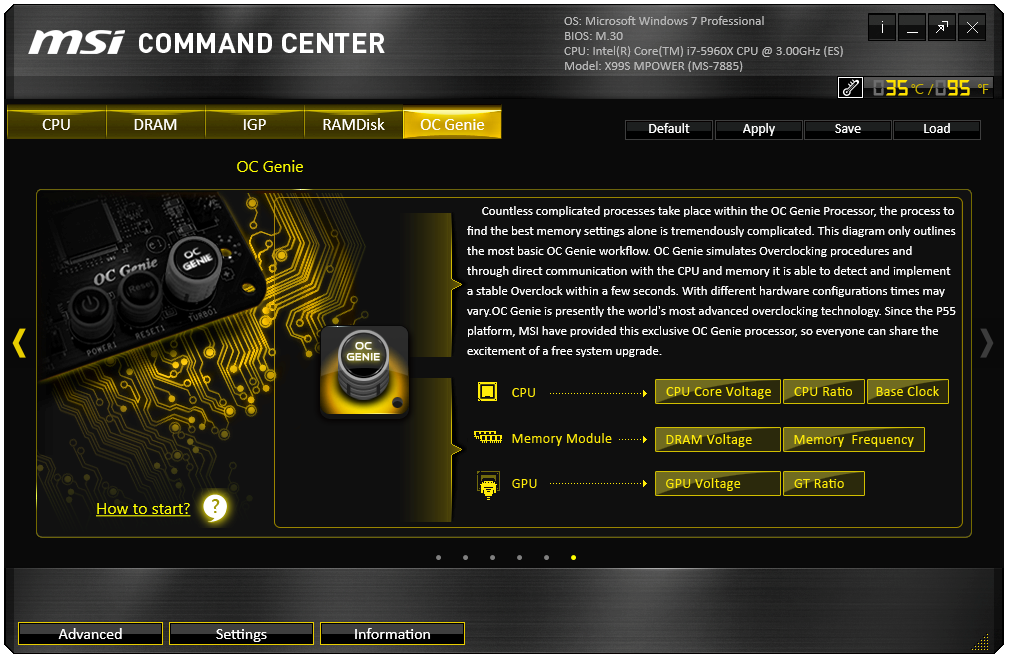
Enabling OC Genie can also be done in software if the button onboard is unavailable – either through Command Center here or via the BIOS. This would be a great place for MSI to offer different OC Genie options, although it is perhaps an opportunity missed.
Aside from the monitoring and information tabs also in Command Center, users can download and install two newer software packages aimed at extreme overclockers that cannot install extra fluff in order to squeeze the maximum performance out of their systems.
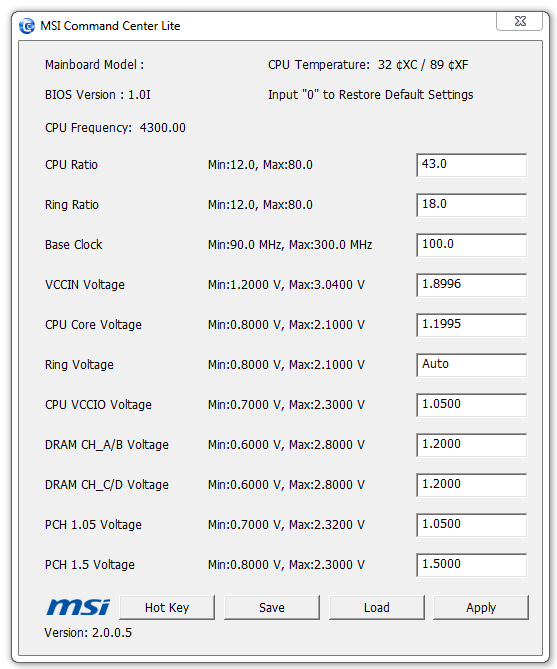
CC Lite is now on v2, suitable for X99 processors. Here adjusting the text and clicking Apply is all that is needed to enable an overclock. Users can also adjust the overclock with a selected hotkey, which is especially useful for benchmarks that have variable CPU load sections.

Newer to the Lite family is the CC Memory adjustment software. Similar in nature to CC Lite, the focus here is on the memory sub-timings.
Overclockers also have to install the DirectOC driver and software in order to adjust the processor frequency jumps that the DirectOC buttons perform.


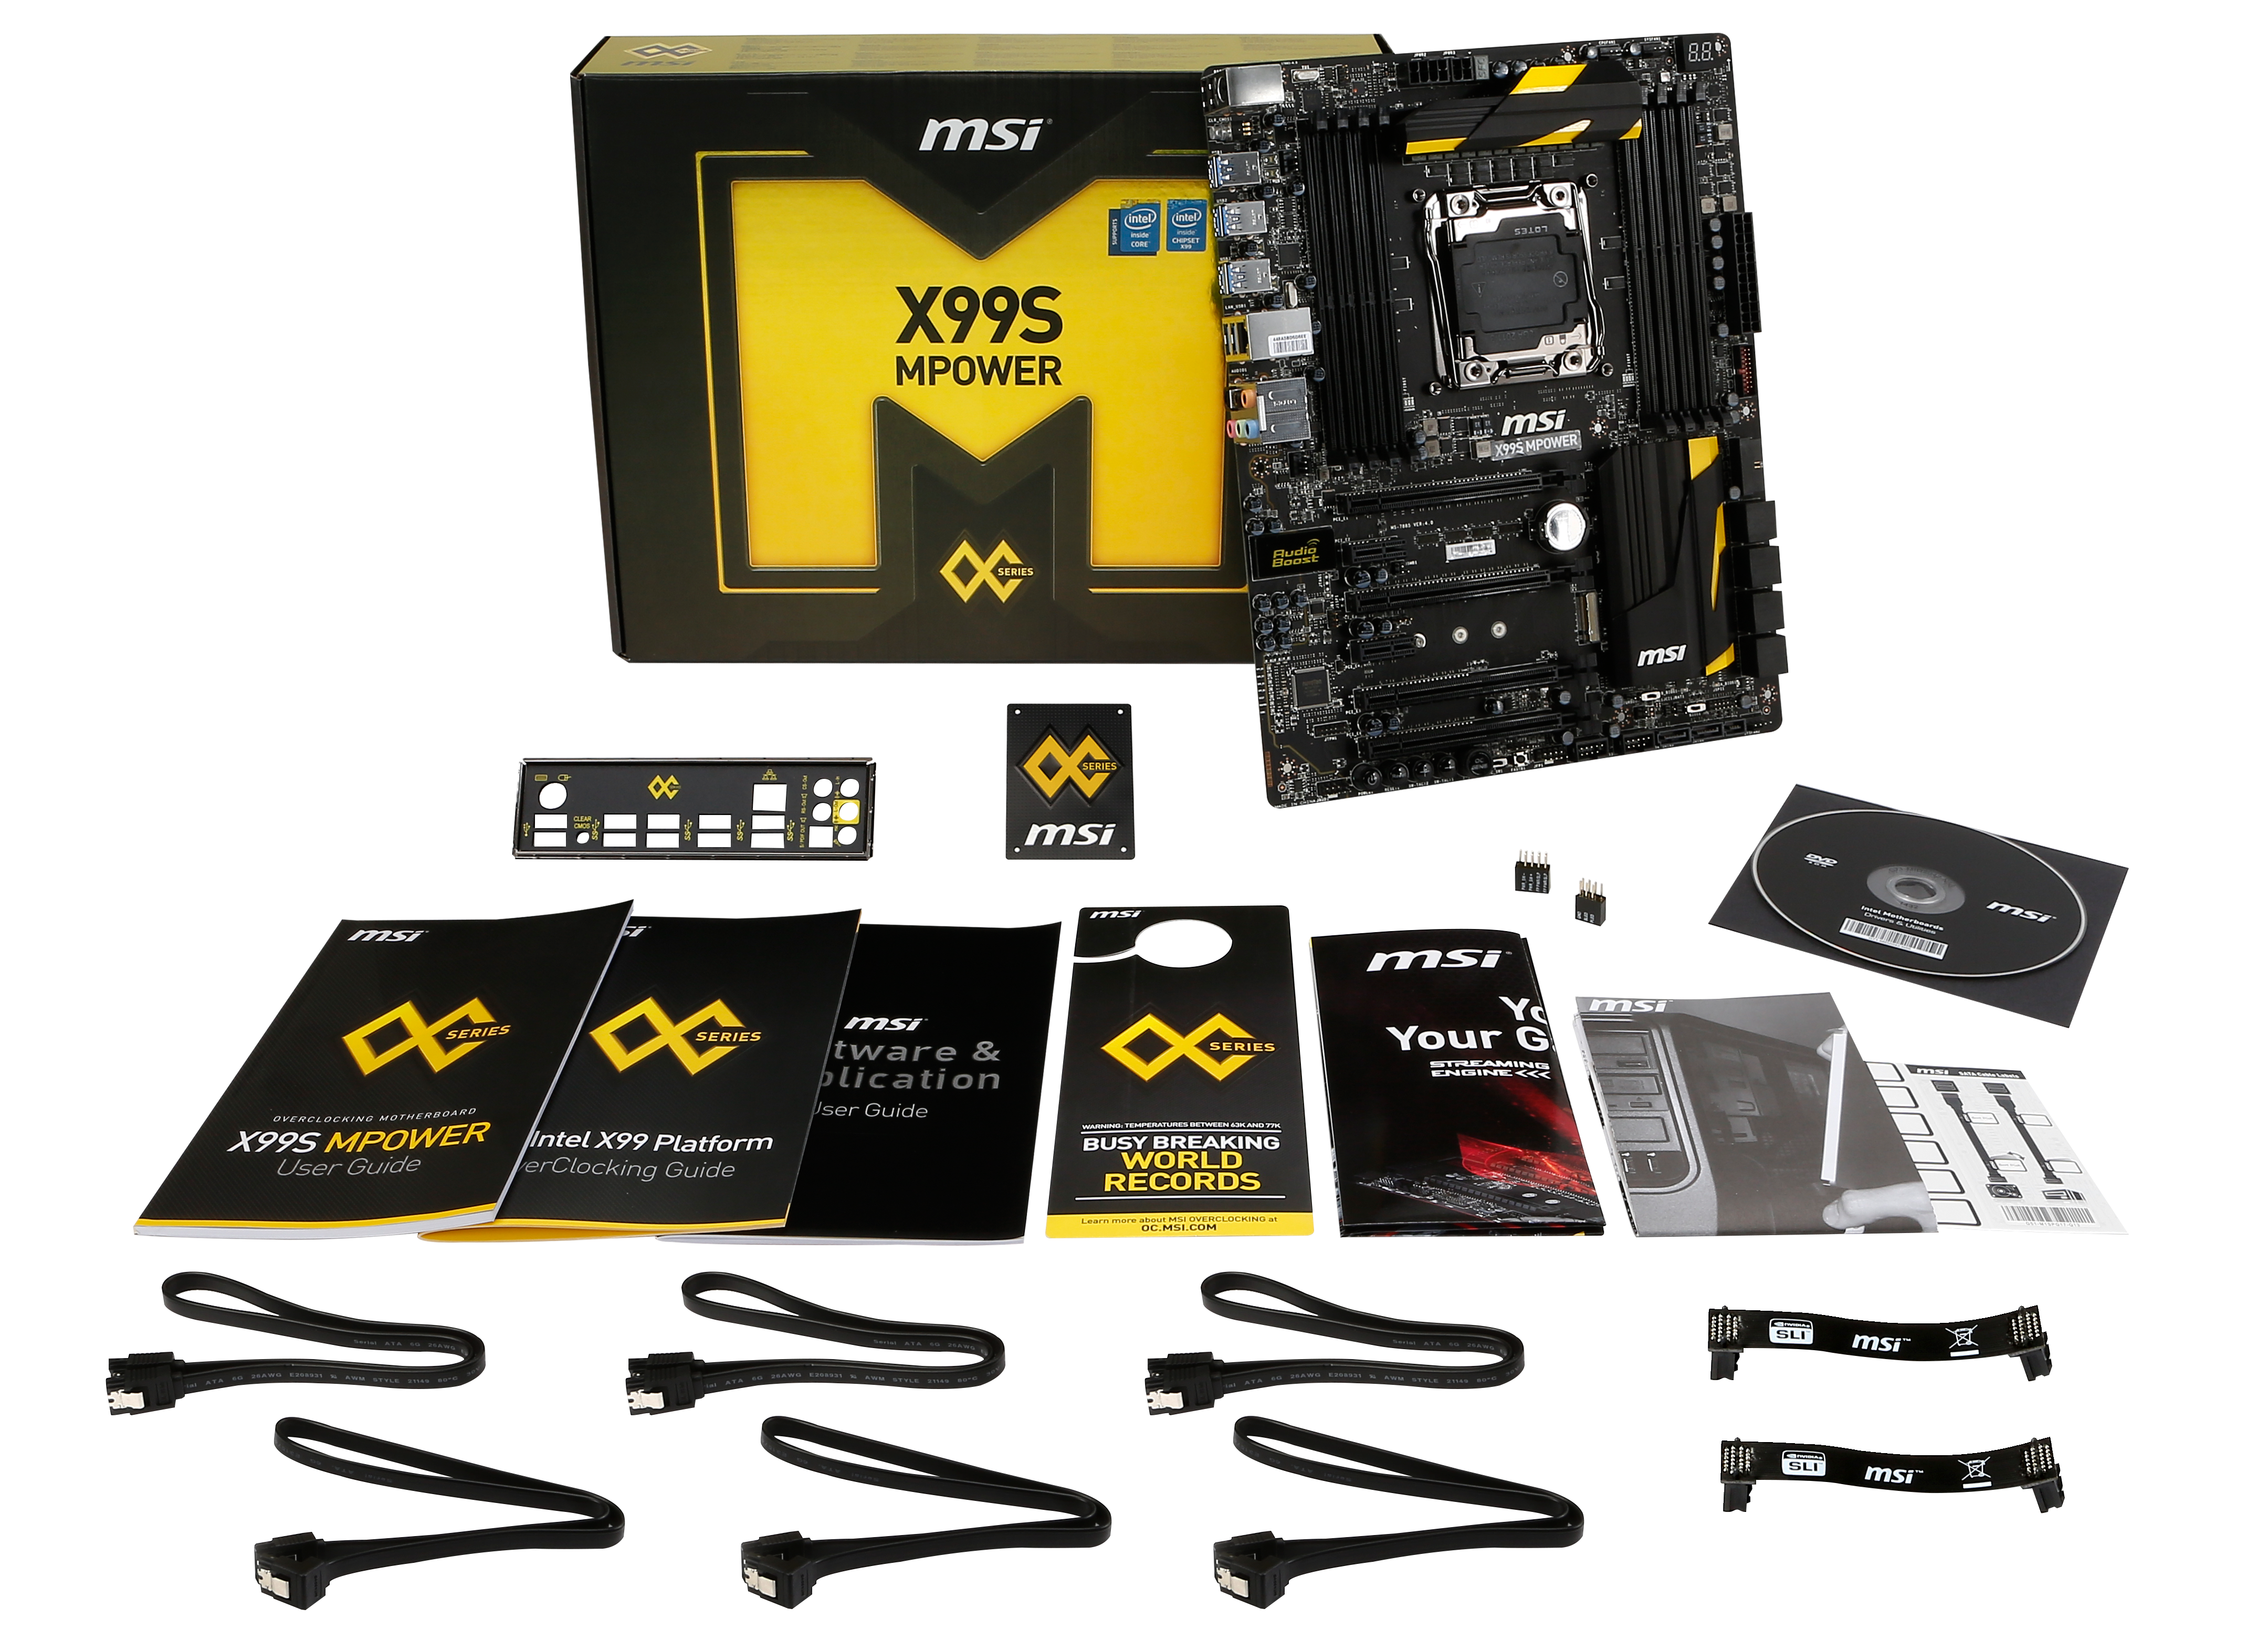
MSI X99S MPower In The Box
We mention in every motherboard review that the box content matters. In some cases, depending on the extras, it can approach 5-10% of the overall system cost. In an industry where every part of a cent is examined in close scrutiny, shaving $0.02 by taking out a couple of SATA cables is done on a regular basis. With the high end market there is more leniency to include these extras, especially when it comes to a themed range such as gaming or overclocking. The point here is that the motherboard manufacturer wants to envelop the user into their ecosystem and their products, and the box contents are one angle of attack. MSI’s box contents are as follows
OC Themed Rear Shield
OC Themed Chassis Badge
User Guide
Overclocking Guide
Software Guide
OC Door Hanger
MSI Poster
Quick Start Guide
Cable Stickers
Easy Connectors for Front Panel
Driver Disk
Six SATA Cables
Two Flexi-SLI Bridges
There is a good amount going on here, especially with a bundled overclocking guide. The door hanger and poster is a bit much for anyone over 25, which is doubled by the fact that this platform is geared for those with a bit more spare cash which tends to be the generation over 25. The chassis badge is reasonably decent, and six SATA cables for 10 ports is par for the course. What MSI has failed to realize is the SLI situation – for three-way GPU setups, two SLI cables is not enough. When trying to implement three-way SLI with flexi-cables, such as with GTX 770 Lightnings that stick out in the way of rigid connectors, you need three cables in what feels like a very odd configuration:
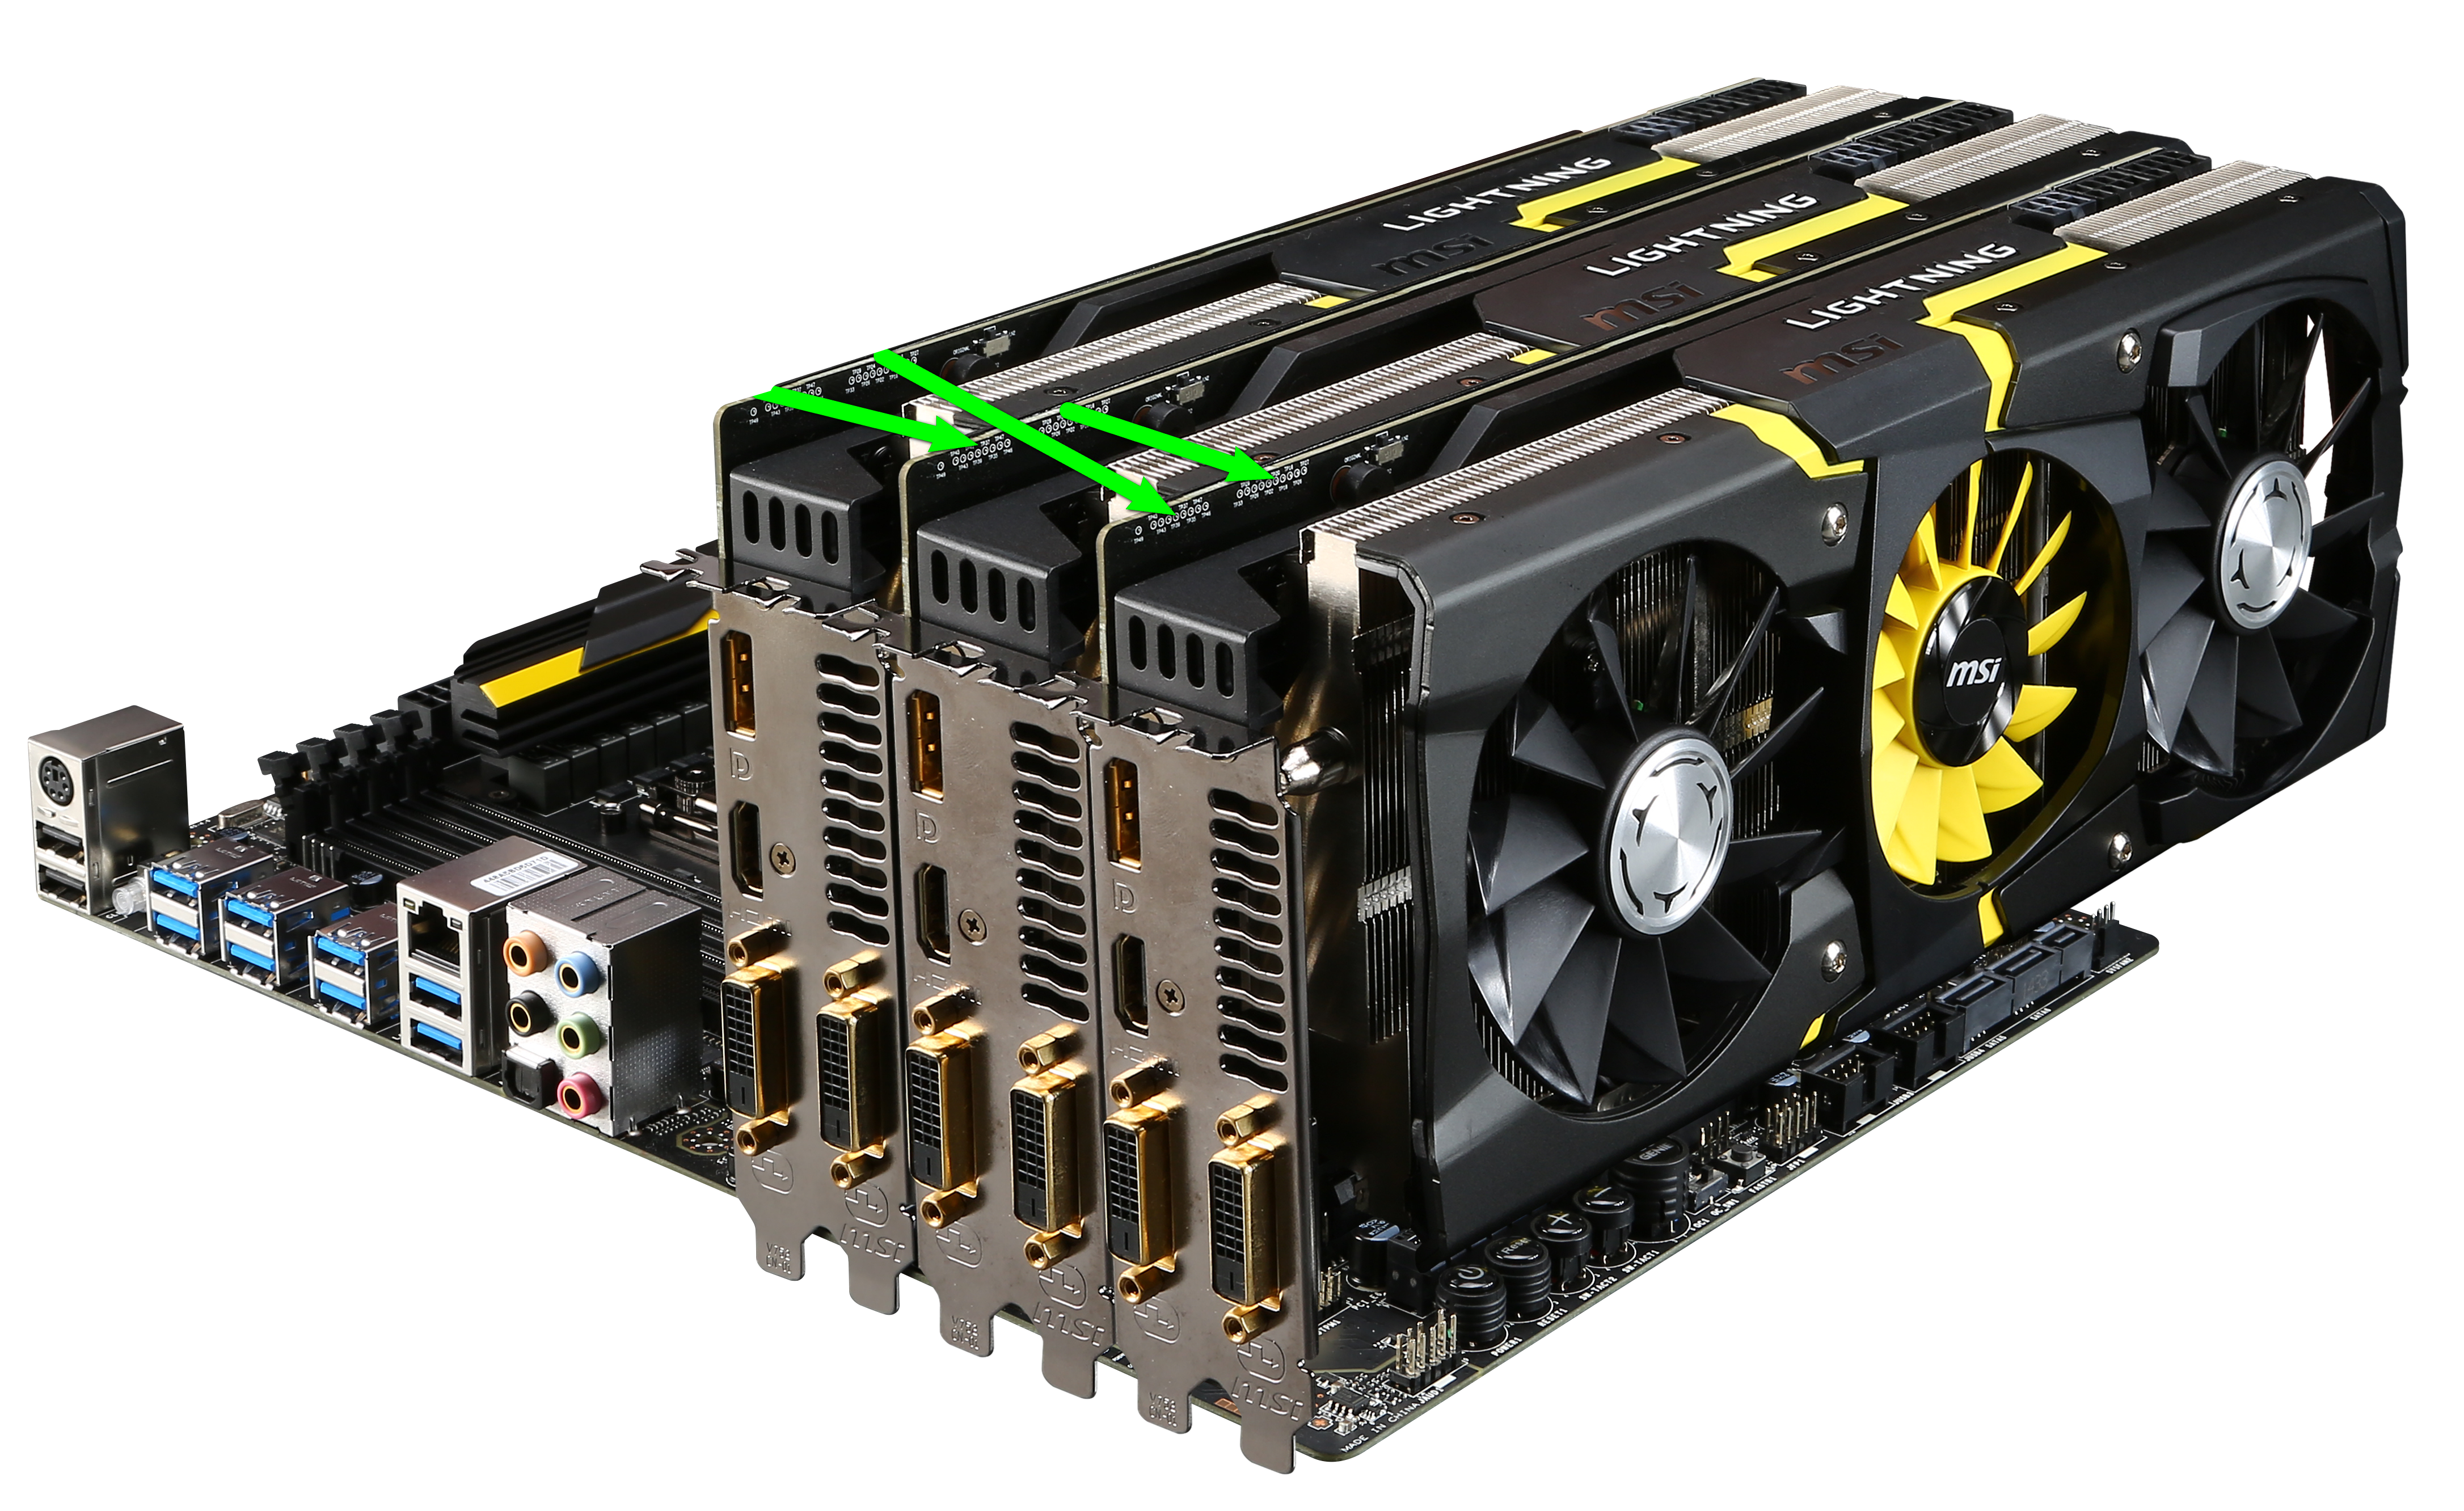
The SLI paths go from card 1 to card 2, card 2 to card 3 and card 1 to card 3. Any other combination refuses to enable SLI mode in the drivers we use, but it means that three cables are required. So MSI’s product team that figured out the included bundles are either too familiar to Crossfire and assume it is the same, or just missed the ball.
Many thanks to...
We must thank the following companies for kindly providing hardware for our test bed:
Thank you to OCZ for providing us with PSUs and SSDs.
Thank you to G.Skill for providing us with memory.
Thank you to Corsair for providing us with an AX1200i PSU.
Thank you to MSI for providing us with the NVIDIA GTX 770 Lightning GPUs.
Thank you to Rosewill for providing us with PSUs and RK-9100 keyboards.
Thank you to ASRock for providing us with some IO testing kit.
Thank you to Cooler Master for providing us with Nepton 140XL CLCs.
Test Setup
| Test Setup | |
| Processor | Intel Core i7-5960X ES 8 Cores, 16 Threads, 3.0 GHz (3.5 GHz Turbo) |
| Motherboards | MSI X99S MPower |
| Cooling | Cooler Master Nepton 140XL |
| Power Supply | OCZ 1250W Gold ZX Series Corsair AX1200i Platinum PSU |
| Memory | Corsair DDR4-2133 C15 4x8 GB 1.2V G.Skill Ripjaws 4 DDR4-2133 C15 4x8 GB 1.2V |
| Memory Settings | JEDEC @ 2133 |
| Video Cards | MSI GTX 770 Lightning 2GB (1150/1202 Boost) |
| Video Drivers | NVIDIA Drivers 332.21 |
| Hard Drive | OCZ Vertex 3 256GB |
| Optical Drive | LG GH22NS50 |
| Case | Open Test Bed |
| Operating System | Windows 7 64-bit SP1 |
| USB 2/3 Testing | OCZ Vertex 3 240GB with SATA->USB Adaptor |
MSI X99S MPower Overclocking
Experience with MSI X99S MPower
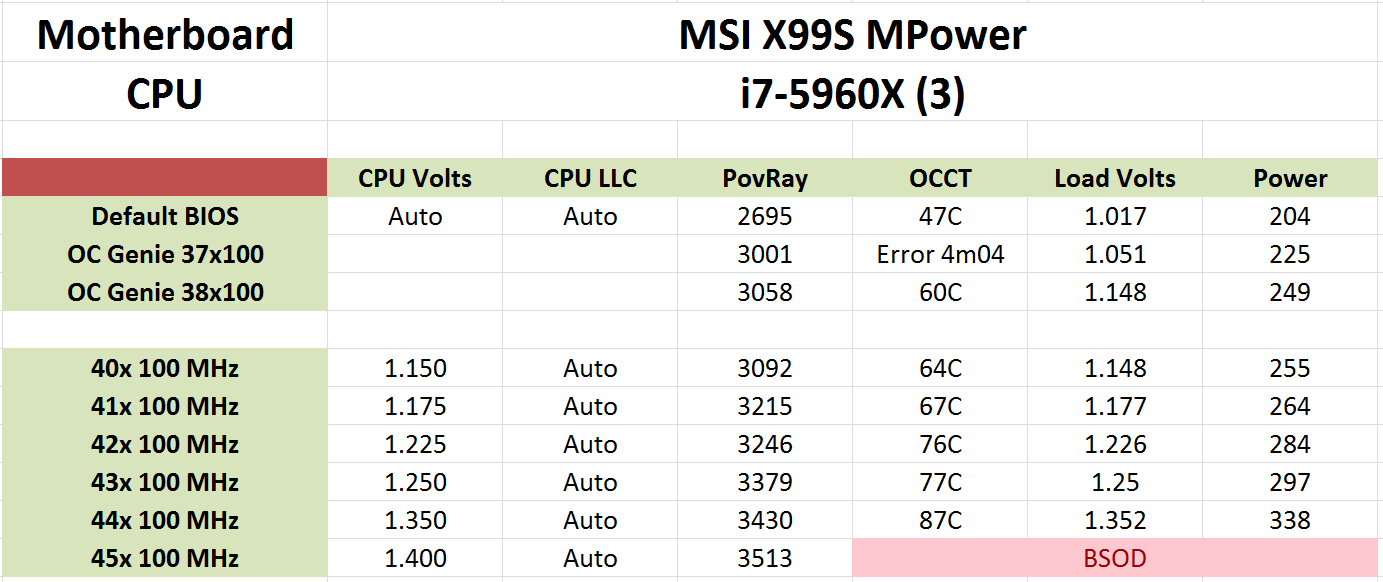
MSI has several things right with the way they do things. The look of the motherboards is often a plus point, as well as the positive branding. Software such as Live Update is a plus to the business as well. The overclocking side of things, while they have improved with the realignment of the BIOS options for X99, still needs a fair bit of work. For the automatic overclock options, we only get a choice of OC Genie in one of two very similar modes. There is no option to test for peak overclocks, or a variety of overclocks to choose from. These two modes are all there is to work with, which for someone who wants to overclock but doesn’t have the confidence is not the best way to do things. I have spoken to MSI on this issue, in order to expand their look-up-tables for overclocking options, and I hope it changes in the future.
For manual overclocking, the software has one big issue relating to the voltage on offer. Command Center offers a dial up to 2.1 volts for the CPU, which is partially insane as even extreme overclockers do not need that much. A better way would be to offer 1.4 volts in software and have an advanced mode that extends that range. Manual overclocking from the BIOS was straight forward enough now that MSI has adjusted the order of the OC options, however there are a number of options that make no sense even with the help guide attached, such as the vDroop control. MSI needs to hire someone who can convert the overtly engineer-only technical jargon to something more understandable and more relatable to the end user.
From our overclocking performance, we saw nothing out of the ordinary here on our mediocre CPU. The first OC Genie mode caused an OCCT error due to the voltage being too low.
Methodology
Our standard overclocking methodology is as follows. We select the automatic overclock options and test for stability with PovRay and OCCT to simulate high-end workloads. These stability tests aim to catch any immediate causes for memory or CPU errors.
For manual overclocks, based on the information gathered from previous testing, starts off at a nominal voltage and CPU multiplier, and the multiplier is increased until the stability tests are failed. The CPU voltage is increased gradually until the stability tests are passed, and the process repeated until the motherboard reduces the multiplier automatically (due to safety protocol) or the CPU temperature reaches a stupidly high level (100ºC+). Our test bed is not in a case, which should push overclocks higher with fresher (cooler) air.
Overclock Results
System Performance
Power Consumption
Power consumption was tested on the system while in a single MSI GTX 770 Lightning GPU configuration with a wall meter connected to the OCZ 1250W power supply. This power supply is Gold rated, and as I am in the UK on a 230-240 V supply, leads to ~75% efficiency > 50W, and 90%+ efficiency at 250W, suitable for both idle and multi-GPU loading. This method of power reading allows us to compare the power management of the UEFI and the board to supply components with power under load, and includes typical PSU losses due to efficiency. These are the real world values that consumers may expect from a typical system (minus the monitor) using this motherboard.
While this method for power measurement may not be ideal, and you feel these numbers are not representative due to the high wattage power supply being used (we use the same PSU to remain consistent over a series of reviews, and the fact that some boards on our test bed get tested with three or four high powered GPUs), the important point to take away is the relationship between the numbers. These boards are all under the same conditions, and thus the differences between them should be easy to spot.
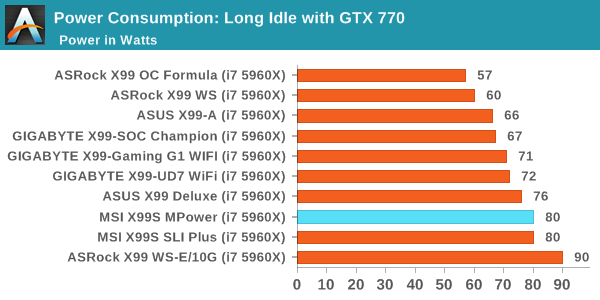
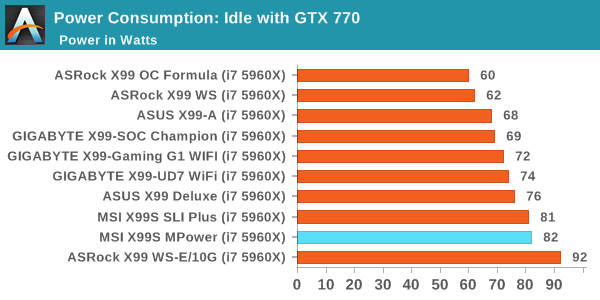
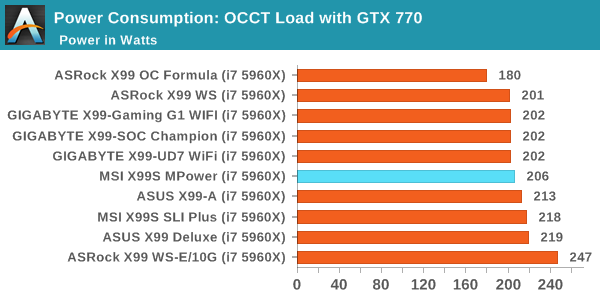
Idle power numbers are very high for the MPower, matching the SLI Plus – I’m not too sure what exactly Is going on there. Despite that, the load numbers bring it back into the ~200W category of X99, giving one of the smallest idle-to-load deltas.
Windows 7 POST Time
Different motherboards have different POST sequences before an operating system is initialized. A lot of this is dependent on the board itself, and POST boot time is determined by the controllers on board (and the sequence of how those extras are organized). As part of our testing, we look at the POST Boot Time using a stopwatch. This is the time from pressing the ON button on the computer to when Windows 7 starts loading. (We discount Windows loading as it is highly variable given Windows specific features.)
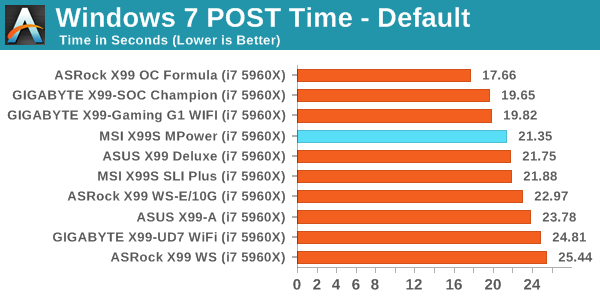
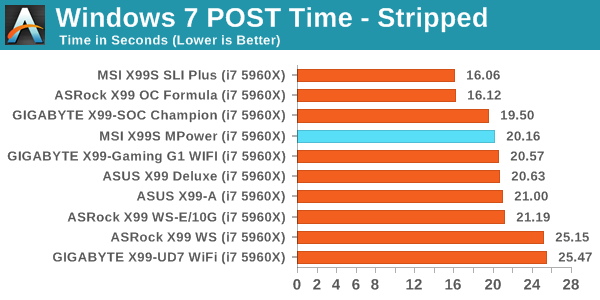
20 to 25 seconds is the ballpark for X99, and the X99S MPower fits in at just over 21.
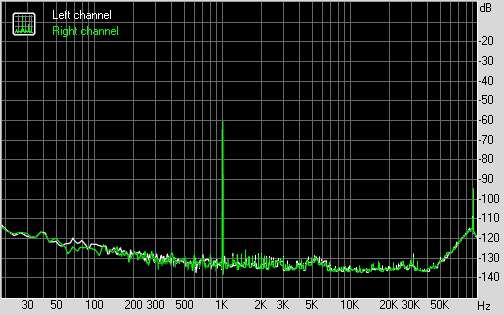
Rightmark Audio Analyzer 6.2.5
Rightmark:AA indicates how well the sound system is built and isolated from electrical interference (either internally or externally). For this test we connect the Line Out to the Line In using a short six inch 3.5mm to 3.5mm high-quality jack, turn the OS speaker volume to 100%, and run the Rightmark default test suite at 192 kHz, 24-bit. The OS is tuned to 192 kHz/24-bit input and output, and the Line-In volume is adjusted until we have the best RMAA value in the mini-pretest. We look specifically at the Dynamic Range of the audio codec used on board, as well as the Total Harmonic Distortion + Noise.
Dynamic Range of MSI X99S MPower
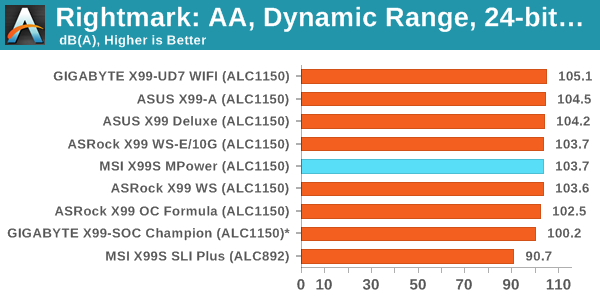

Audio results are good, with the system scoring over 103 dB on dynamic range but falling a little short of -80 dB on SNR.
USB Backup
For this benchmark, we transfer a set size of files from the SSD to the USB drive using DiskBench, which monitors the time taken to transfer. The files transferred are a 1.52 GB set of 2867 files across 320 folders – 95% of these files are small typical website files, and the rest (90% of the size) are small 30 second HD videos. In an update to pre-Z87 testing, we also run MaxCPU to load up one of the threads during the test which improves general performance up to 15% by causing all the internal pathways to run at full speed.
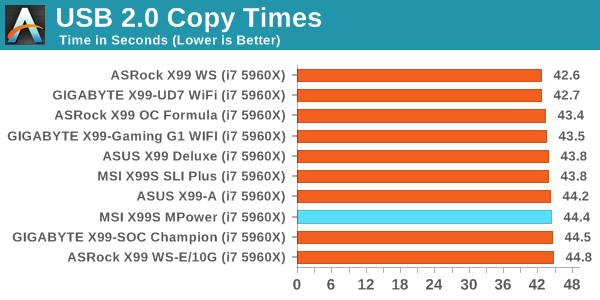

USB 2.0 speed comes in a little slow compared to the rest but the USB 3.0 speed on the PCH points is better than average.
DPC Latency
Deferred Procedure Call latency is a way in which Windows handles interrupt servicing. In order to wait for a processor to acknowledge the request, the system will queue all interrupt requests by priority. Critical interrupts will be handled as soon as possible, whereas lesser priority requests such as audio will be further down the line. If the audio device requires data, it will have to wait until the request is processed before the buffer is filled.
If the device drivers of higher priority components in a system are poorly implemented, this can cause delays in request scheduling and process time. This can lead to an empty audio buffer and characteristic audible pauses, pops and clicks. The DPC latency checker measures how much time is taken processing DPCs from driver invocation. The lower the value will result in better audio transfer at smaller buffer sizes. Results are measured in microseconds.
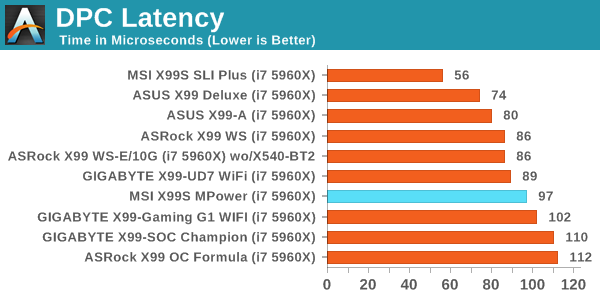
Under 100 microseconds is a good result for the MSI X99S MPower.
CPU Performance
Readers of our motherboard review section will have noted the trend in modern motherboards to implement a form of MultiCore Enhancement / Acceleration / Turbo (read our report here) on their motherboards. This does several things, including better benchmark results at stock settings (not entirely needed if overclocking is an end-user goal) at the expense of heat and temperature. It also gives in essence an automatic overclock which may be against what the user wants. Our testing methodology is ‘out-of-the-box’, with the latest public BIOS installed and XMP enabled, and thus subject to the whims of this feature. It is ultimately up to the motherboard manufacturer to take this risk – and manufacturers taking risks in the setup is something they do on every product (think C-state settings, USB priority, DPC Latency / monitoring priority, memory subtimings at JEDEC). Processor speed change is part of that risk, and ultimately if no overclocking is planned, some motherboards will affect how fast that shiny new processor goes and can be an important factor in the system build.
For reference, the MSI X99S MPower does not enable multicore turbo on BIOS 22.1.
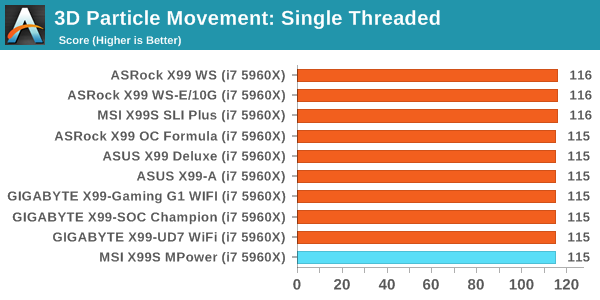
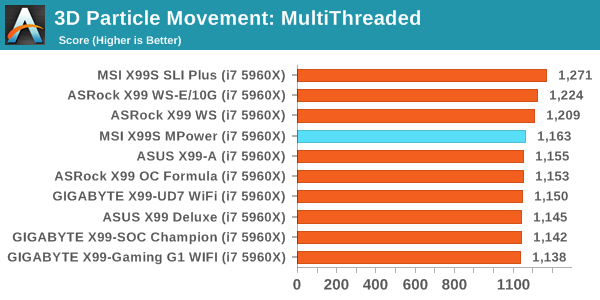
Point Calculations – 3D Movement Algorithm Test: link
3DPM is a self-penned benchmark, taking basic 3D movement algorithms used in Brownian Motion simulations and testing them for speed. High floating point performance, MHz and IPC wins in the single thread version, whereas the multithread version has to handle the threads and loves more cores. For a brief explanation of the platform agnostic coding behind this benchmark, see my forum post here.
Compression – WinRAR 5.0.1: link
Our WinRAR test from 2013 is updated to the latest version of WinRAR at the start of 2014. We compress a set of 2867 files across 320 folders totaling 1.52 GB in size – 95% of these files are small typical website files, and the rest (90% of the size) are small 30 second 720p videos.
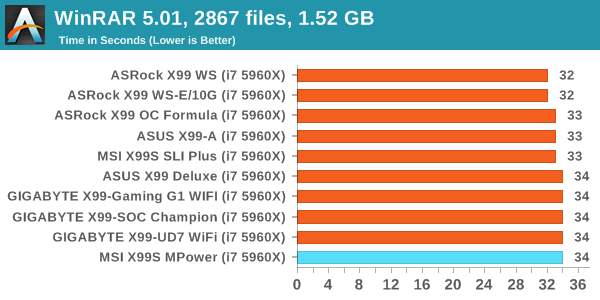
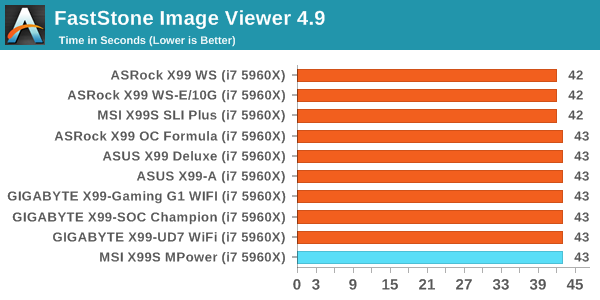
Image Manipulation – FastStone Image Viewer 4.9: link
Similarly to WinRAR, the FastStone test us updated for 2014 to the latest version. FastStone is the program I use to perform quick or bulk actions on images, such as resizing, adjusting for color and cropping. In our test we take a series of 170 images in various sizes and formats and convert them all into 640x480 .gif files, maintaining the aspect ratio. FastStone does not use multithreading for this test, and thus single threaded performance is often the winner.
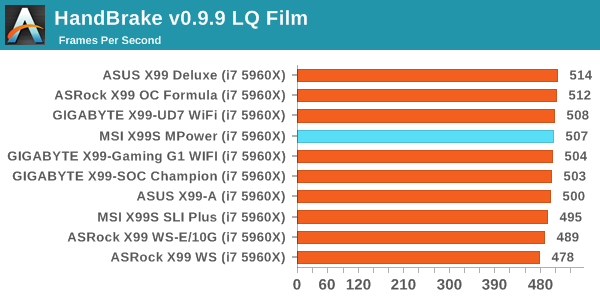
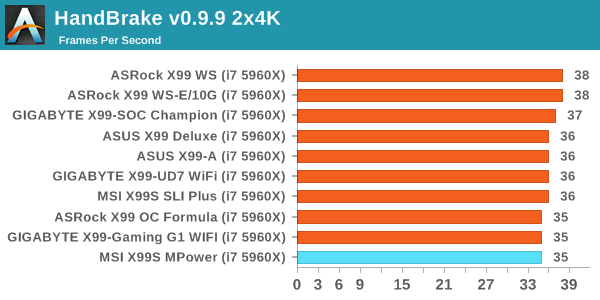
Video Conversion – Handbrake v0.9.9: link
Handbrake is a media conversion tool that was initially designed to help DVD ISOs and Video CDs into more common video formats. The principle today is still the same, primarily as an output for H.264 + AAC/MP3 audio within an MKV container. In our test we use the same videos as in the Xilisoft test, and results are given in frames per second.
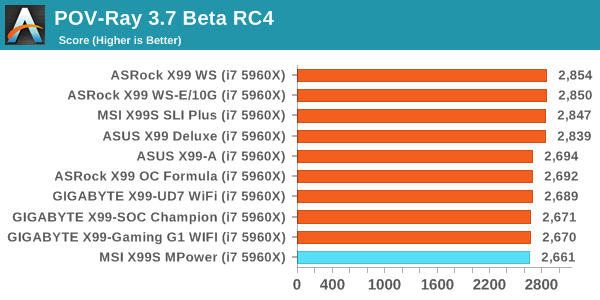
Rendering – PovRay 3.7: link
The Persistence of Vision RayTracer, or PovRay, is a freeware package for as the name suggests, ray tracing. It is a pure renderer, rather than modeling software, but the latest beta version contains a handy benchmark for stressing all processing threads on a platform. We have been using this test in motherboard reviews to test memory stability at various CPU speeds to good effect – if it passes the test, the IMC in the CPU is stable for a given CPU speed. As a CPU test, it runs for approximately 2-3 minutes on high end platforms.
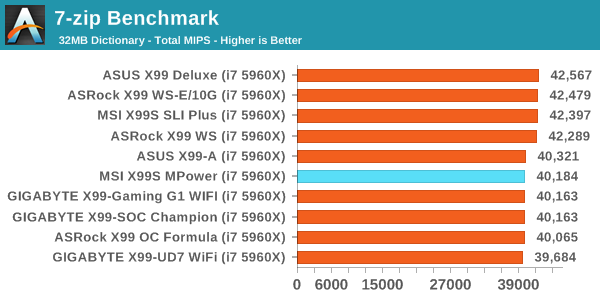
Synthetic – 7-Zip 9.2: link
As an open source compression tool, 7-Zip is a popular tool for making sets of files easier to handle and transfer. The software offers up its own benchmark, to which we report the result.
Gaming Performance
F1 2013
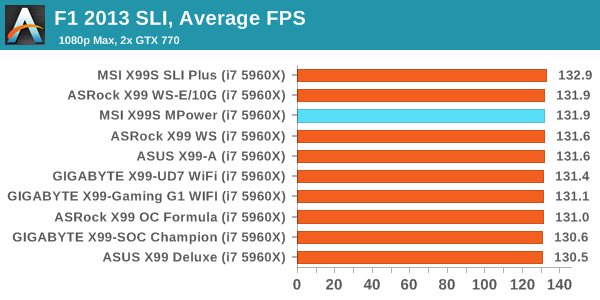
First up is F1 2013 by Codemasters. I am a big Formula 1 fan in my spare time, and nothing makes me happier than carving up the field in a Caterham, waving to the Red Bulls as I drive by (because I play on easy and take shortcuts). F1 2013 uses the EGO Engine, and like other Codemasters games ends up being very playable on old hardware quite easily. In order to beef up the benchmark a bit, we devised the following scenario for the benchmark mode: one lap of Spa-Francorchamps in the heavy wet, the benchmark follows Jenson Button in the McLaren who starts on the grid in 22nd place, with the field made up of 11 Williams cars, 5 Marussia and 5 Caterham in that order. This puts emphasis on the CPU to handle the AI in the wet, and allows for a good amount of overtaking during the automated benchmark. We test at 1920x1080 on Ultra graphical settings.

Bioshock Infinite
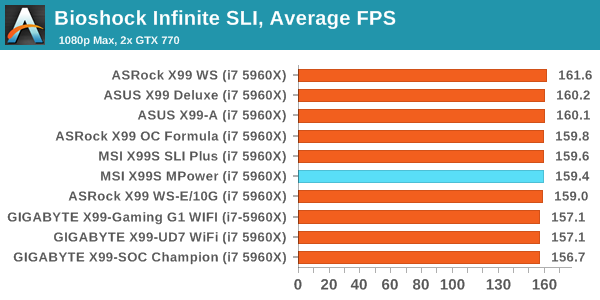
Bioshock Infinite was Zero Punctuation’s Game of the Year for 2013, uses the Unreal Engine 3, and is designed to scale with both cores and graphical prowess. We test the benchmark using the Adrenaline benchmark tool and the Xtreme (1920x1080, Maximum) performance setting, noting down the average frame rates and the minimum frame rates.

Tomb Raider
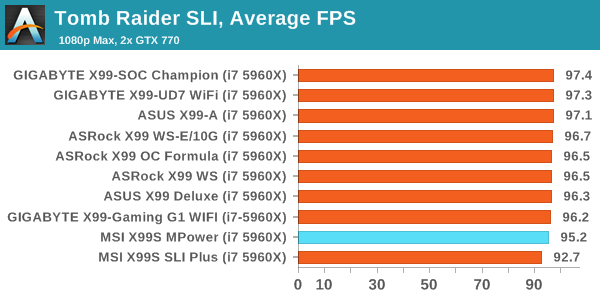
The next benchmark in our test is Tomb Raider. Tomb Raider is an AMD optimized game, lauded for its use of TressFX creating dynamic hair to increase the immersion in game. Tomb Raider uses a modified version of the Crystal Engine, and enjoys raw horsepower. We test the benchmark using the Adrenaline benchmark tool and the Xtreme (1920x1080, Maximum) performance setting, noting down the average frame rates and the minimum frame rates.

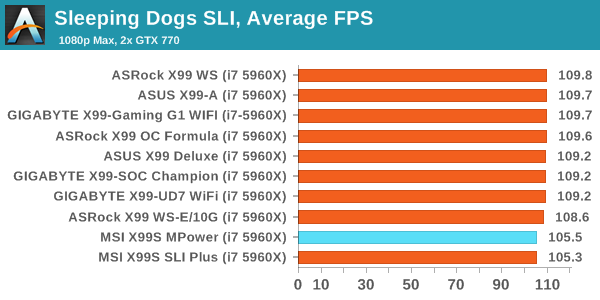
Sleeping Dogs
Sleeping Dogs is a benchmarking wet dream – a highly complex benchmark that can bring the toughest setup and high resolutions down into single figures. Having an extreme SSAO setting can do that, but at the right settings Sleeping Dogs is highly playable and enjoyable. We run the basic benchmark program laid out in the Adrenaline benchmark tool, and the Xtreme (1920x1080, Maximum) performance setting, noting down the average frame rates and the minimum frame rates.

MSI X99S MPower Conclusion
There are two types of overclocking enthusiasts. The bigger camp contains those that overclock for better daily performance, but the more interesting side attempts to push hardware to the limit for records. Ultimately what ends up happening is that a motherboard manufacturer has to cater for both, and the casual overclocking crowd brings in the money while the extreme users supply the glory.
Unfortunately this dichotomy raises a few questions. In 2015, most motherboards overclock the same on the CPU side for 24/7, perhaps all within 5% or 200 MHz at the absolute most, and the major factor here is more the luck or nature of the CPU itself. That means a cheap overclocking motherboard can actually be a good thing. The flip side of this is that extreme overclockers need an element of over engineering to deal with -150ºC temperatures with liquid nitrogen, which pushes up the cost. For the 24/7 overclockers, these high end boards might offer a lot of superfluous features in terms of engineering, and the recommendation for these users is not positive when the product is over $400 for X99.
With that being said, a well-positioned high-end motherboard can drive sales lower down the stack. We have seen motherboards like the Rampage X79 Extreme drive high-end sales, or the Z87X-OC aggressively attack the mid-range overclockers and be very successful. While the X99S MPower in this review performed well, it doesn't have the wow factor that the true hall-of-fame boards have had.
On the hardware side, the MSI X99S MPower promotes its overclocking credentials through the two-stage OC Genie button, onboard OC buttons as well as an easier to use overclocking BIOS compared to previous generations. Other hardware over the default configuration include Audio Boost (an upgraded Realtek ALC1150 audio solution with an EMI shield, PCB separation and additional filter caps), a SATA Express port, an M.2 PCIe 3.0 x4 port, support for multiple graphics cards and the yellow/black livery and styling. MSI likes its bundles, so there is a stick-on chassis shield included along with a door hanger and cable stickers. The usual array of SLI bridges are also part of the package, although one too few for 3-way SLI requiring users to go and get another.
Nothing untoward occurs in our benchmark numbers, although for a non-multicore turbo base BIOS it does come across as an aggressive implementation. The DPC Latency comes in at under 100 microseconds, and the audio solution comes on the top half of the comparison points, but the idle power numbers join the MSI X99 SLI PLUS at the bottom of the leaderboard. The BIOS still has some nice fan control interaction, as well as a rearranged overclocking section to make things easier compared to previous MSI chipsets, and the software still has one of the best auto-update tools available. It is a shame that the control software makes it too easy to push up the voltage to ridiculous levels.
Competition for the MSI X99S MPower comes from many different angles, such as the X99-SOC Champion, the X99 OC Formula and some of the more general gaming models. $300 is a big battle ground for X99, switching over from the cheaper end to the more mid-range, and the MSI X99S MPower has a number of positive points to make it worth considering. There is not one killer feature like some of the other models, but MSI has historically played it safe on that front, preferring to spend extra on the style and experience instead.


